Free shipping on orders over $100! **After discounts have been applied & Continental US only

Jennifer

APS Foils & APS Foil Adhesive

APS Foil Adhesive was designed to provide you with the best adhesion for foil transfers and my foil collection has fabulous release!  What a nice combination to work with and makes foiling projects enjoyable!  I know that my foil Obsession is due to creating my own Foil Adhesive, which has made the transfer of foils amazingly easy.

Here are a few tips and tricks for using the APS Foil Adhesive (APSFA) and installing/transferring foils:  First, it’s not a bad idea to stir up the material if you see any separation in the bucket…..I have yet to see this happen!  You will also get the best transfer of foils when applying the APSFA over a sealed surface – if your surface is porous/adsorbent, the APSFA will soak in and not provide as great of a transfer (you could also try a second layer of APSFA for a better transfer – this is only recommended on a porous surface) – so, keep in mind the substrate that you are working on.  My favorite roller for applying the APSFA is the Wooster low-nap roller and just ONE coat of the APSFA will do you!  (my APSFA should save you time and money – only one coat needed for a great transfer)!  Pour the APSFA into a paint tray and work it into the roller and then apply a thin, even coat of the APSFA to the surface.  Allow the APSFA to dry to a firm tack – this will be approximately 30 to 45 minutes – best to wait longer than try to apply too soon!  The APSFA will never dry beyond a firm tack – so you have from the time it tacks up until whenever you get back to the project to transfer the foil (the surface will be tacky – I don’t recommend days – anything can stick to this surface)!  I love working my days, if possible, that the last thing I do is roll up the APSFA and allow it to sit overnight – come back the next morning and install/transfer the foil!!!

Now that your APSFA is applied to the surface and dried to a firm tack – it’s time to transfer the foil!   Not all foils are manufactured the same and they release different – some better than others. My collection has a very easy release and works wonderfully with my APSFA.  So, let’s talk about foils – what they are and how they work.  Basically, you have a very thin film of color that is applied to a clear plastic backing material, that needs something stick enough (APSFA) to grab the color and transfer it to another surface.

There can also be a learning curve or two with transferring foils……You knew it couldn’t be that easy!!!  One of my best tips is to make sure you are trying to transfer the correct side of the foil – I tell everyone to make sure the “pretty” side is facing you and you sure don’t want to the get the wrong side stuck onto the APSFA – this can actually de-activate the APSFA.  Because the APSFA is so sticky – if the wrong side gets on it, there is nothing to pull off and it will stick really well…….when you finally pull it off, it will take some of the adhesive off and you will not get a good transfer in that area.  You can always repair this area – just apply another layer of the APSFA and again, allow it to tack up.

Foiling by Nicole Nichols

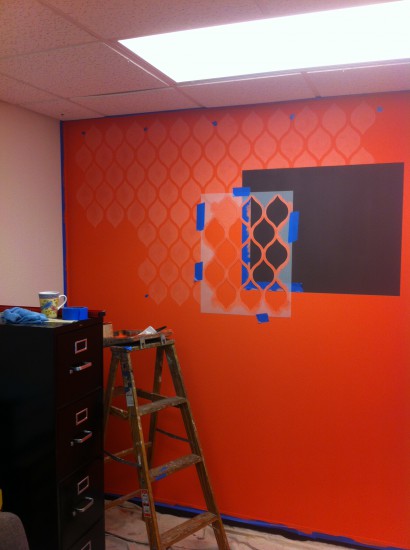
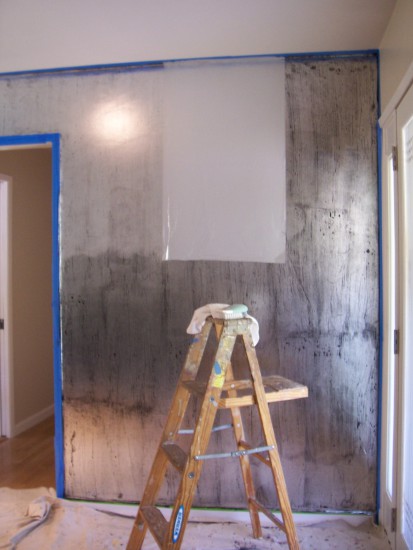
I do recommend having a helper when installing/transferring foils – so recruit a friend for the project!!!  It’s nice to have someone hold onto the other end of the foil and keep it away from the surface until you are ready to smooth it onto the surface area.  So, have one person at the top of the wall – starting at the top left corner and trying to keep it straight, apply the foil to the surface by rubbing it with your hand or a terry rag works well.  Continue down the wall, smoothing out the piece as you go down towards the bottom of the wall.  If the walls are tall or you are working alone – cut sections in manageable lengths, i.e. 10-foot wall – cut sections 3′, 4′, 5′, 6′ and 7′ long.  This way you can handle the length of the foil and have the joint lines staggered at different heights – you don’t want to end up with a horizontal line going through the wall at the same height.

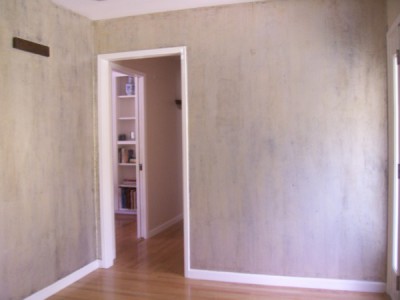
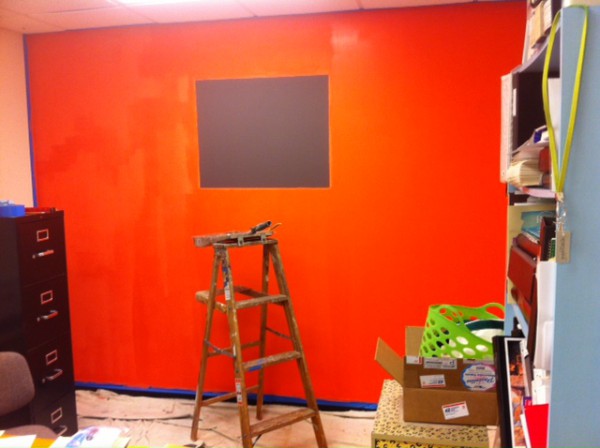
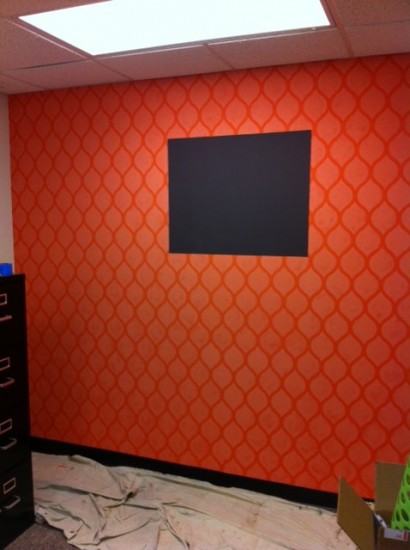
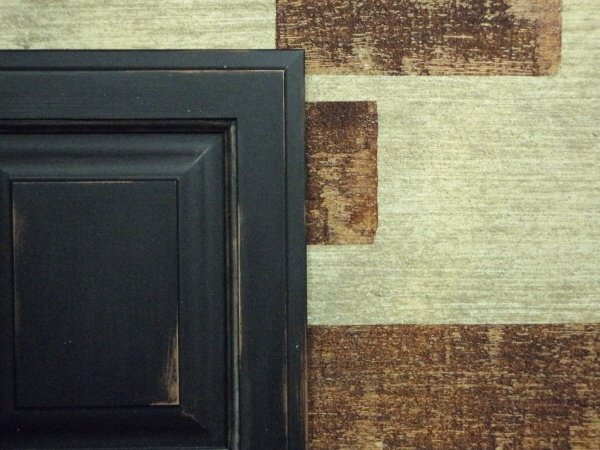
This picture shows the first layer of foil installed – I did this alone and just cut the pieces in manageable lengths to handle by myself.  Another thing you need to know about transferring the foils is how you scrub them.  When I’m installing a sheet – I use a terry rag to smooth it onto the surface, trying not to get too many air bubbles.  But, transferring the foil will take a little more pressure then just lightly rubbing it.  Now, another one of those learning curves is that the way you scrub the foil will also transfer in the pattern – i.e., if you use a circular motion, you will see this in the foil transfer.  I find it best to use a scrub brush and keep the motion of scrubbing the surface vertical.  Also, if you get any air bubbles in the foil, lift up one side to release the air bubbles and re-smooth out that area and scrub again.

036
Apply the second layer of foil – Pewter

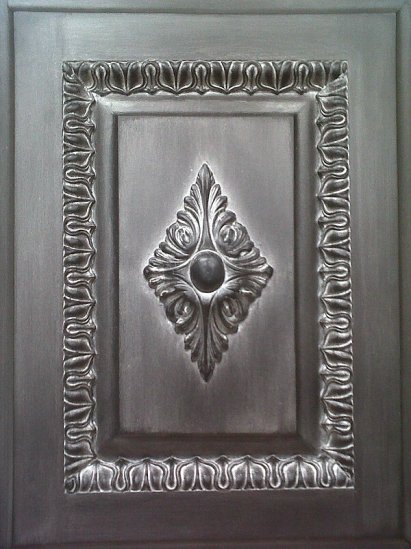
I like to stress the fact – that nothing is perfect about transferring foils – so embrace the imperfections – I refer to them as “happy accidents” or “features”!!!  As you apply your sections – try not to scrub all the way to the edge of the foil and leave a little salvage edge – you’re better off with imperfect edges than straight lines.  Overlap the next section of foil, so that you can blend into the irregular lines you create.  I also recommend that you protect your foil finishes – you can glaze over them, clear coat over them – you just allow them to be part of the finish.  Make sure to create a sample board 🙂

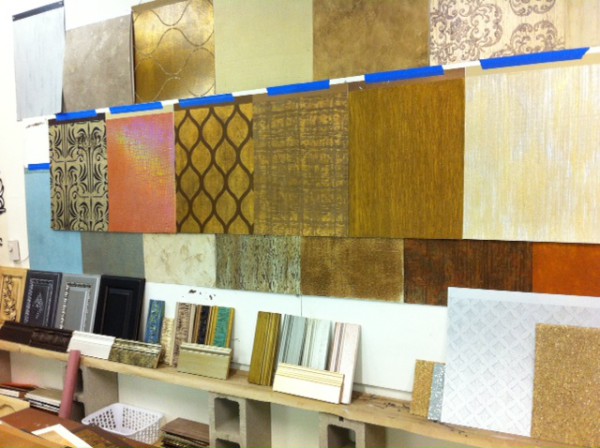
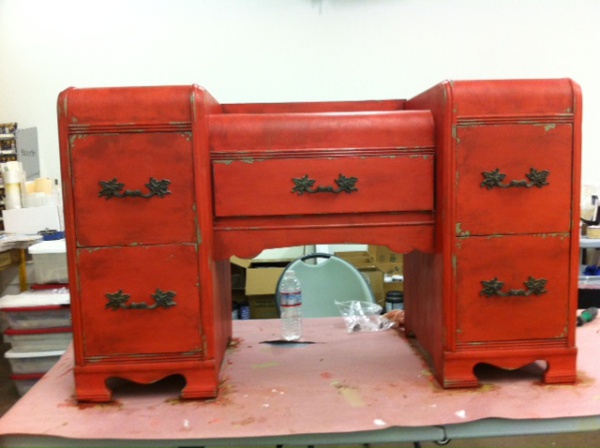
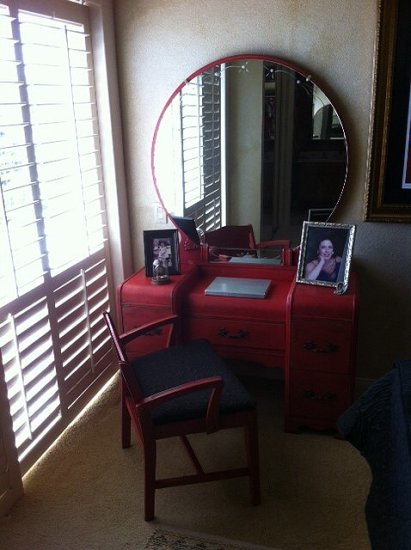
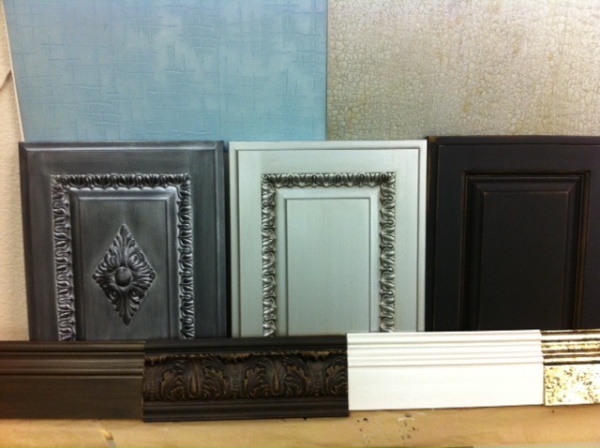
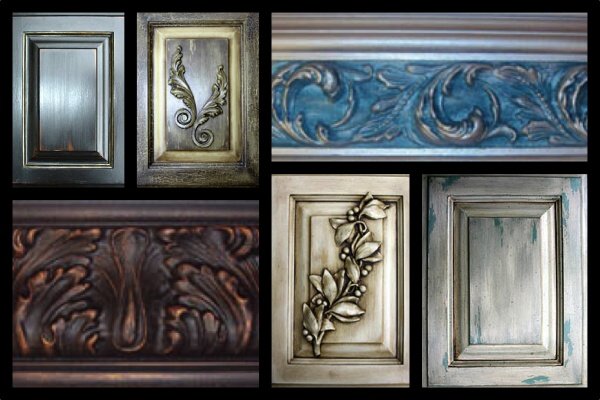
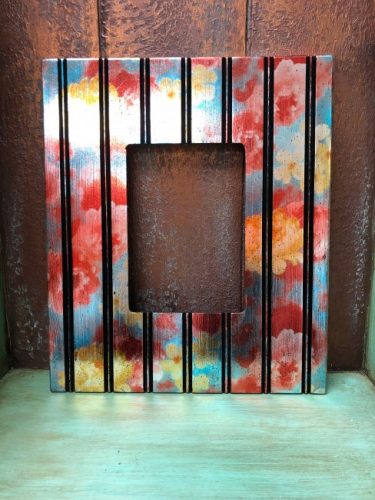
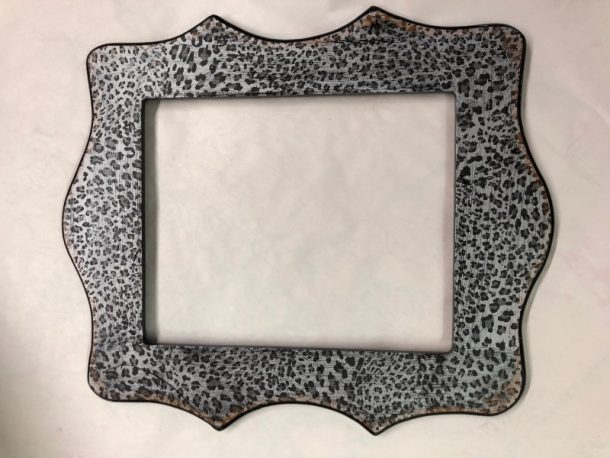
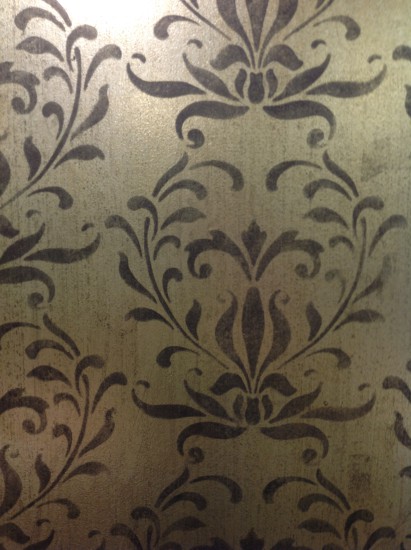
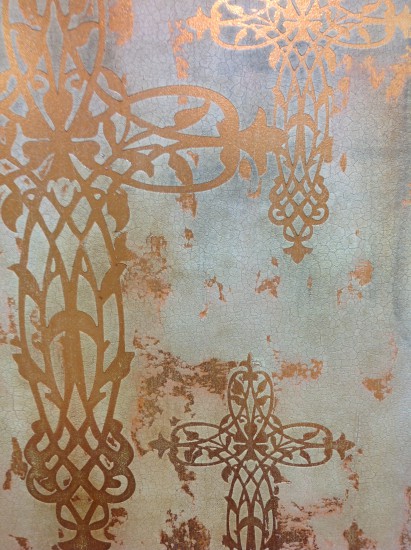
Here a few foil finishes that I have been creating – love working with all my foils and incorporating them into beautiful finishes 🙂

Stenciling over foil background
Foil back ground under Cross
Foil background under Cross
Using a stencil pattern when transferring foil

I really hope that this information helps with your foiling projects – my best advice is to practice on some sample boards and get the hang of it…..it really is an easy process and so much fun!  There isn’t anything else that shines like foils other than Leaf!  But foils are cheaper and faster than leafing…….

Check out my web site for the complete collection of foils – over 75 different colors, patterns, and holograms.  You can order a sample pack for $10 – which includes 40 different foils in a 4″ square – also all foils are available for purchase by the foot and several different size rolls.   APS Foil Adhesive is available in pints, quarts, and gallons to accommodate any size project.   You will find everything at www.artisticpaintingstudio.com  –  Also please feel free to call with any questions – you can reach the studio at 714-386-3243 or email to Jennifer@artisticpaintingstudio.com

Happy Foiling…..:)

Before Foils
After Foils by Jenn Ruoss Lamb


Let’s Chalk it up!!! Creation of a Chalk Board wall….

I have only been in my new studio space for little over a year (4th studio space in 25 years) – so it’s still a work in progress for me!  Time doesn’t always permit for me to complete a painting projects for myself.  But a few months back, I decided that I needed to clean up my office and one thing lead to another…….LOL  While I was cleaning up the floor area behind my desk – I decided that “NOW” was a great time to paint that wall!

office wall
office wall

I had this idea running through my head for awhile and had wanted to create a Chalk Board Wall using the American Paint Company’s Chalk/Clay/Mineral based paints.  So, with the way things get done around here – I went into my studio and found a color spoke to me at that moment –  CORAL REEF🙂  and also Wild Horse’s for the center “framed Chalk Board”.

office2

I grab some tape, a pencil and the frame I wanted to use.  Marked off the area for the Chalk Board and painted Wild Horses – I applied three coats, knowing I would season this area and use it as a Chalk Board.  While I was waiting for that to dry, I taped off the rest of the wall so I could paint the Coral Reef color.  I love painting with the APC paints – I had great coverage in one coat with the Coral Reef paint.

wall

Now – I just couldn’t stop at that point 🙂 I went digging through my stencil designs and decided to pull out one of my newest patterns – Contempo Modern and stencil an all-over-repeat design.  I wanted a tone-on-tone look, so I took the APC Coral Reef and added some Home Plate to lighten it up – maybe around a 75/25 mixture for the stencil color.  The stencil pattern has registration marks to that you can work from right to left and top to bottom – so I just kept stenciling in every direction until I finished out the entire wall.

August 2014 170

wall1

Then came the Frame project – this was a frame that I found at a wonderful little shop I like to stop by once in a while and just see what wonderful little finds she has hidden a away for me!!!  I like creating contrast for interest – so I went looking through my colors and couldn’t help but pick one of my favorite combinations – Surfboad and Home Plate.

frameframe2August 2014 232


I started out by painting on two coats of the Home Plate – allowing each layer to dry in between and then painted on the Surfboard in a “hap-hazard” fashion (very messy looking).  Allowed this to dry and then came in with my “wet-blending technique” and blended the bad paint job of the Surfboard into the Home Plate – using wet cheesecloth.  I will even spray water onto the surface and blend the colors together.   As I was wet blending, I happened to expose some of the original frame color for some highlighting.

August 2014 229August 2014 236

Once everything was dry – I wiped/brushed on a mixture of the Clear and Dark Waxes to create a medium tone wax finish.

Everyone that walks into my office loves the wall – they all say it makes them smile.  I’m not sure if I’m done with this project yet or not – time will tell if I execute the rest of my ideas floating in my head 🙂

chalk wall


Chalk it up Peeps!!!

Pattern Rollers – Another Obsession

Chrysanthemum Roller

Pattern rollers have been around for a long time and I played with them a few years back, but never embraced  their possibilities. Over the last year or so, I started looking for these rollers once again and have been playing around with the different textures that I can create with and how FUN they are to incorporate in my decorative painting.

Roller collection
Roller collection

I have been posting on Facebook over the past several months, showing the different roller patterns/textures I have found and have been using in my decorative painting.   My friends/followers have been asking many questions about using them in decorative painting and I thought it would be fun to address these concerns/questions/issues in a blog post…….hopefully I answer everyone’s questions – but if not, please feel free to post questions here!!!

Python - Diamonds - Crocodile and more
Python – Diamonds – Crocodile and more

To start with – there are many different patterns and textured rollers available to work with and I have found that I can just about roller through any texture material (all the products I use are made by Proceed by Golden or Modern Masters).  The texture materials that are a little more heavy bodied, like Smooth Absorbent Texture (Proceed by Golden) is a little easier to work with than a “slick” texture like Smooth Translucent Texture…….the roller can possibly slide, instead of roll through these textures.  But you can always mix the two of these products together and make a “new” wonderful texture material to play with (that’s a hint – love them mixed together – 50/50)!!

Artsy Leaf Pattern
Artsy Leaf Pattern
Tiger Skin roller
Tiger Skin roller

But, with a little practice and playing around – you can work with any texture material  and may discover you end up with a favorite texture or two!!!

When working in different texture materials – I use my Japanese trowel to apply the texture to the surface, working in sections 2 to 3 feet wide and ceiling to floor if possible (depending on the open-time of the material you are working with).  Once the texture has been applied to the surface, it helps to “wet” the roller in a bucket of water and then roll through the texture – you can clean the roller off in the water bucket to prevent the roller from getting loaded with too much material (I even learned this trick recently and love it).

Crocodile Skin Roller

There are many different patterns to choose from (www.artisticpaintingstudio.com/shop/tools/rollers/) – the patterns can be rolled vertically – horizontally – create stripes or random application – you are the artistic creator with these rollers and there really are not any rules!

One question I have been asked over and over:  How do you handle corners, crown molding and baseboards?  There are several options to handle all these areas.

1st option:  There is a tool that has a rubber tip and you can uses this tool to hand carve the pattern into the areas that the roller is not reaching or continuing to print.

Carving pattern tool

2nd option:  Purchase two rollers – cut one off the roller and use this as a stamp to print the pattern into the hard to reach areas.

3rd option:  Be creative in the layout of your design – you could always frame a wall, leaving a border all around the pattern roller – creating more interest to the design.

Chrysanthemum Roller Random application

You will find that the rollers will “peak” up the edges of the material as you roll through it – which will require some sanding once it is dry.  Sand the surface using 150 to 250  grit sandpaper to remove the “high pecks” if necessary.  Complete the finish using your creative juices – using foils, glass beads, glaze, optional plasters, etc.

Sanding high peaks
Sanding high peaks

So far I have discussed all negative options for working with these rollers but you can also create a positive effect by rolling into paint and rolling the design onto a painted wall/surface.

I love working with them on furniture – drawer fronts are wonderful to work on and no issues of corners/etc.

From floral to animal skins – there are many pattern options to work with and the possibilities are endless…..I have been playing for many months and feel I have not even scratched the surface of options.  You can order these on line for Art Rollers – they range in price from $12.95 to $20.95 for the Rubber style rollers and $49.95 for the Shamie style rollers.

Snake Skin roller
Snake Skin roller
Cascade Roller
Cascade Roller
Chrysanthemum Roller

Durability and life of a pattern roller is another question that I have been asked – these are all rubber material rollers and all materials that I have worked with to date and washed off the surface with no issues and as long as you take care of the roller – they should last a long time!  The Shamie style rollers have also held up very well – I rinse well and then use a little soap to clean out residue left behind.

I have most of the rollers available on my online store – but some of them have just come in and have not been loaded on the site – if there is a roller you’re looking for and can’t find – please just call the studio at 714-386-3243 and I will help you out.  I also teach many classes that incorporate using these rollers – so you can get hands on experience working with different rollers and different textures.

Blessing to all, Jenn

Dumpster Diving – TrashFormations

I think there are many different things they call it these days – but I always referred to it as “Dumpster Diving”!  Not that I actually ever dove into a dumpster – but I have been known to look carefully through a few to find a “treasure” or two…..
Recovered "junk" to repurpose
Recovered “junk” to repurpose
I personally have been “junking” for at least the past 20 years. I think it’s kind of an addiction – once you get the BUG, it’s very hard to pass up a Yard Sale, Antique shop, Thrift Store or something that was “kicked to the Curb”……I like to say, I’m Junking 🙂 I started Junking with a friend many moons ago – we both loved to paint and felt the NEED to transform everything we bought. Our Junking days lead to a couple of books that we wrote together – Painted ChairsPainted WhimsiesTrashFormations and Painted Fabric Fun.
TRASHformations
TRASHformations
Painted Chairs was the first book I wrote and chairs had always been one of my favorite pieces to paint……I started collecting chairs with the vision to transform them all and write a book.  I was lucky enough to “score” the deal and Painted Chairs was published.  BUT, my addiction to buy chairs just couldn’t stop……at one point I had to rent a storage unit to store them all!  LOL  I finally had to give up and had the biggest YardSale of the neighborhood back in 2008…..most people assumed it was a multi-family event (but it was just my obsession to buy everything I saw)!!!
Old chair - ready for transformation
Old chair – ready for transformation
My Junking days had to be spread out – after letting go of the storage unit and Paying to store my “great finds” – I realized there just wasn’t enough hours in the day to paint all my junk and I had to quit buying everything I found!!!
Big score on frames!
I do have a few weaknesses – Old Sash Windows – Vintage Doors and Frames……these items are always hard to me to pass up!  I think part of my love for Junking is the search for something unique that speaks to you – whatever that may be.  Searching through Antique shops, yard sales, Vintage shops – Good Will and Salvation Army are two of my FAVS!!!
Old Sash Windows
Old Sash Windows
I have made myself a promise that I can’t buy anything else until I paint two items I already have…….I’m running out of room once again!!!
Old Side-light windows ready for transformation
I’m currently working on Transforming an old picture frame that will frame my Chalk Board that I painted on my office wall.  I’m using the American Paint Company chalk/clay/mineral based paints on this project.
Transforming an old picture frame
One more project to Up-Cycle and I get to go junking again.  For me – I feel I’m giving something discarded new life – keeping our planet a little Greener and I love taking the personality of the piece and adding to it’s natural charm.
Up-cycled projects
Up-cycled projects

 If you are looking for inspiration on your next TrashFormation – make sure to check out my books on line at www.artisticpaintingstudio.com Have fun painting something!!!!

Teaching – My True Passion

I never knew that I had such a heart and passion for teaching until I opened my first retail store in October of 1994 – The Stencilled Garden, located in Fresno, CA.

I had been decorative painting for about 5 years when I decided I wanted to open a place where I could share my love of stenciling with others. Over the years in which I offered my decorative painting services, I had many customers/clients indicate that they would love to learn what I did. This set my mind in action – that not everyone could afford to hire an artist to come paint for them – but there should be a place that offered supplies, specialty products, stencils and classes – so that anyone could learn and paint something beautiful in their home!

The Retail Shop Area

So I opened “The Stencilled Garden” to provide a place to buy stencils/products and learn the art of stenciling so you could do it yourself!!! I started offering classes on the art of stenciling as soon as I opened my studio/store and found that I “loved” teaching others to stencil.

Classroom area of studio

Many people believe that they have no artistic talent and to see someone’s face light up when they start creating with a stencil and how artistic they truly can be – is a Joy and Blessing for me! In the 18 years that my studio was located in Fresno, CA – I think I taught just about everyone in town to stencil 🙂

My studio quickly evolved into a decorative painting studio – where someone could buy products for just about any project. I started offering classes in Faux, Plasters, project classes and just about anything related to painting!!!

Workshop Finishes on Display

Well, I moved my studio January of 2013 to Southern California – can’t say I had much of a plan (other than I was ready for a change and my kids were all settled at college)! I once again opened up a new studio in Huntington Beach, CA – a creative place to inspire others to paint something! My studio offers many different products from stencil brushes and acrylic paints to specialty brushes to create a full wall finish – I’m a decorative painting studio that has everything for your projects, furniture, floors, ceilings, walls, and cabinetry.

Workshop in progress

I still find JOY in teaching others – whether it’s beginner holding a stencil brush for the first time or a fellow artist looking for new inspiration. My place is open to all – newbies – beginners – advanced decorative painters……you will always find the products you need, the advice to complete the project, the training to know what to do with your project from start to finish.

My classes are listed on my web site and private lessons are always an option too!!! www.artisticpaintingstudio.com/classes/

Jennifer having hands on training with a student

What else can I say – I LOVE to teach painting – share my talents and knowledge with others………Be Blessed!

Black is beautiful in furniture and cabinetry finishing!

Black Shimmer Cabinet Finish

I have been painting in the decorative finishing world for about 25 years now and one of my favorite surfaces is furniture and cabinetry. Furniture can take on a personality and it’s so much fun to start a piece and see where it goes. NO, I never have a complete plan when starting a project – if I waited for that to happen, I would never start anything!

My "chippy" finish
My “chippy” finish

I love working on my clients projects – shown above – this project included the round mirror, desk and chair. The only direction she provided was the color of red to match and she liked a distressed/chipped look. What fun for me – I love painting something prefect and then destroying it to make it look old and worn. Here is a picture of the finished set.

Project for Debbie
Project for Debbie

So this Blog is suppose to be about Black furniture and cabinetry – okay let’s get back on track!!! For the past five years or so – Black has been my main color for cabinetry – to me Black is the new neutral.
One of my favorite projects was a friends kitchen – the transformation was just amazing and even with a ton of cabinets – my Tuscan Nights finish looks Fabulous and didn’t make her kitchen look a bit smaller – actually the finished kitchen looked bigger! Here are before and after pictures.
[

Before picture of Kitchen
After picture Kitchen

Working with another one of my clients – this house being very contemporary – most cabinetry was finished with Black or Metallic Silver.

Entertainment Center - Fireplace - Bar cabinetry
Entertainment Center – Fireplace – Bar cabinetry

Looing at this picture – I even did the floor in a multi-layered Black/Silver concrete finish.

Bar Cabinets - Metallic Silver/Black finish
Bar Cabinets – Metallic Silver/Black finish

I love the dramatic appearance of a Black finish and it has been one of the most popular finishes! I think Black can go anywhere – create a focal point or have a conversation piece.

Tuscan Nights Finish

Black cabinetry is a staple for me and most of my students have installed the Tuscan finish at least once – I continue to teach many different versions of the Tuscan Nights along with many wonderful finishes that sell – taking you from the basics of preparation to high-end furniture finishes.

Cabinetry/Furniture workshop samples

Cabinetry/Furniture workshop

Get out your paint brush or sprayer and paint something Black!!! Check out my current Cabinetry/Furniture Workshop @ https://shop.artisticpaintingstudio.com/collections/learn/