Free shipping on orders over $100! **After discounts have been applied & Continental US only

Jennifer

All Things Decorative Foils

My Decorative Foil Collection has grown over the years to one of the most expansive collections in the industry, bringing you just about every color possible and a beautiful selection of patterns and holographic foils to choose from.

With this amazing selection, I have been blessed that my decorative foils have ended up in some incredibly amazing creative hands!!  This blog post is all about foils and the different projects that can be accomplished with these incredible embellishment tools.

Decorative foils can adorn just about any surface as you will see throughout this blog post.  No surface too small or too large as you can purchase the foils in any amount that you need for your project.

All the Fun Projects…

This project was created by Alyson of Pushkar Revival in New Zealand. These nesting tables received a completely fresh new look with the addition of two different foils.

Foils Used: Wild Leopard Spots Large and Leopard Bronze Foils.

This super cute Bee Project was created by Terrie Cosby of The Creators Vintage Store in Drain, Oregon.  Terrie used Foil Adhesive with a silkscreen stencil to create the design and then used one of our newest foils Coy Cheetah Gold.

This lovely little side table was given new life with the Leopard Silver Foil, Black paint, and a fabulous stencil!! It was created by yours truly 🙂

You can even give new life to an old frame laying around the house! Such a super simple and fun project to create.

Wild Leopard Spots Frame: Black Paint, Foil Adhesive, and Wild Leopard Spot Small Foil.

Yes, these amazing foils can also be used on clothing!! Embellish a pair of jeans with Cheetah Silver Foil using our DecoFoil Fabric Adhesive Gel Transfer 🙂

Seriously can’t get enough of foiling my Jeans! I have created a whole new wardrobe with these foils 🙂

Products Used: Hampton Medallion stencil, Deco Foil Spray Fabric Adhesive, and Abigail Flowers Foil.

This dresser was created for my Mom 🙂  The drawer fronts and inside of the drawers were lined with the Abigail Flowers Foil. The dresser was painted in Coastal Blue by General Finishes.

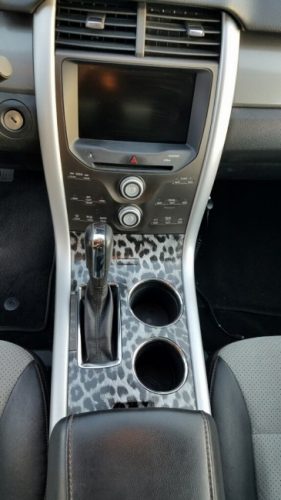
You can even update your car center console with some foils!! Here I used the Cheetah Silver Foil 🙂

Foils can even be a subtle embellishment. The Leopard Bronze Foil was just added to the “feet” of this adorable chest created by Junkin’ Jones Gang.

Even simple frames come alive with the addition of the Odessa Foil which was also embellished with Glass Bead Gel and the Nora Paige stencil 🙂

The Fall and Halloween seasons are so much fun to create projects with foils!! These pumpkins were created with Wisteria Foil and Silver Gold Foil. The Flowerpot was created with Nova Glitter Foil and Orange Foil. And the Wooden Pumpkin was created with the Nora Paige stencil and Nova Glitter Foil. Love how fun and sparkly these projects turned out 🙂

This beautiful dresser was created by Morey Dunbar of PAINTED Studio. She used the Ramsey Rose Silver, Bright Silver and Cloud Silver foils to create this amazing work of art!

This simple, but adorable sign becomes a work of art as Helen adds some Leopard Bronze Foil!

As you can see browsing through all these fabulous projects, decorative foils can be used on anything to add more character and charm.  I hope that this post has inspired you to try your hand at foiling a project or two.  For detailed instructions on how to use the foils, make sure to check out my YouTube Channel and subscribe!

YouTube Channel

Many blessings and thanks for being a part of the Artistic Painting Studio family!!


Santorini, Greece: Day One

Hi there, Ashley here… Jenn’s daughter and her travel buddy in Santorini, Greece. Welllll… I was going to share with you ALLLLL THE THINGS we did in our first three days in Santorini, but I have too much to say and too many pictures I want to share. So… here is everything you need to know about our first day in Santorini, Greece (the most magical place in the world 🙂 )

Day 1:

We started our first full day in Santorini with a quick sweat at the gym in our beautiful hotel, Aqua Blue Hotel. They have a smaller gym, but they have everything you need to get in a good sweat and get that heart racing. After we worked out, we headed to breakfast at the restaurant at Aqua Blue.

Breakfast was included with our stay and boyyyyyy was it amazing. I could definitely get used to that spread every morning and not to mention the beautiful view 🙂

After we ate breakfast we headed for a walk down the main street to see what was all near us. I haven’t mentioned yet, but we stayed in Perissa, which is the “beach side” of the island.

We explored the beach, which isn’t what we are really used to here in California. It was a “rocky” beach… Santorini isn’t known for their great beaches LOL!

Buttttt… Even though their beaches are “rocky” they are still extremely breathtaking!! I mean I don’t think it gets much better than this.

After our walk down the main street and a little time on the beach, we headed back to the hotel for some R&R at the pool.

We threw on our swimsuits and our cute new coverups (you can never have enough cute coverups for the pool 🙂 ) and headed down to the pool.

Now, this pool was beautiful!! We spent the afternoon getting our tan on, reading some good books and taking some much-needed naps. Jet lag is no joke HAHA!

After we were rested, and a little burnt for me (LOL), we headed back up to the room to get ready for dinner. We had no idea where we were going to go, but we figured we would just walk the main street until we found something that sounded good. (Even though they all sounded so good!)

We stopped and got a drink and watched the sun go down. To be honest we probably walk 3/4 of a mile and felt like we deserved it 🙂

I can’t remember the name of this place, but when you walked out of the Aqua Blue Hotel you headed to the right towards Perivolos Beach. It was more of an open space restaurant (I mean most of them are LOL) that served drinks, ice cream, and snacks. We decided on some Pina Coladas 🙂

We then headed back towards our hotel and Perissa Beach, and finally decided on The Volcano for dinner. It was delicious.

We ended dinner with some Baklava and ice cream and WOW it was delicious! I don’t think they use as much sugar and preservatives in Europe, so everything just tastes so much fresher and lighter.

We had an amazing first day in Santorini! Like I still cannot get over how amazing this trip was and I am so excited to be able to share our trip with y’all. It was an incredible 10 days and I would highly recommend for every one of you to visit this beautiful island. I will continue to share our trip over the next few weeks, but if you have any questions at all just leave a comment below 🙂


Santorini, Greece: Our First International Trip

Let me take you back to September 21, 2019…

Getting ready to board our first flight to Zurich, Switzerland!

I’m on my second flight for the day, trying to stay awake so I can get on “local” time, so I decided to tell the story about how I got to Santorini, Greece.

It started about a year ago or close to it, during a conversation with my daughter Ashley.  She had a friend of a friend getting married in Spain and discovered that the flights were dirt cheap.  So, she suggested that we go to Spain (not to the wedding) but just go while her friends were there.  She planted the seed that grew and grew.  We talked about it on and off for months and were trying to decide where we wanted to go.

Getting ready to board our flight to Santorini, Greece!

A big part of me said I had to do this with Ashley before it was too late.   I had discovered that trying to take my mom on any trip was not possible anymore due to her decline in health this past year.   Sometimes it takes a wake-up call to make you realize how precious life is and that you have to stop and smell the roses, take those trips, go on an adventure or two before you aren’t able to anymore.  This pushed me to get serious about this idea of taking an annual mother/daughter trip and making memories together that would last a lifetime.

Spain was an option, just because of the cheap flights, but I never found anything in my searches that really sparked my interest.  Every chance I would have to search the web (and I don’t have a lot of free time to do stuff like this) I would check out different websites trying to locate the place that spoke to me.  This was going to be my first international trip (because I don’t count Mexico, I have to admit, I have been there many times).

I wanted a place that would be a wonderful mother/daughter trip!  It had to have the sun, beaches, and adventure.  I even checked out several places from the screen saver pictures on my desktop that change every day. LOL!  Then one day I was on Facebook, actually just surfing and not working and saw something about this island called Santorini.  WOW, this looked amazing and I started to research the possibility of making this our destination.

I sent Ashley the links I had found, she said “I’m in! I don’t care where we go, let’s just go somewhere!”

Now I finally had an actual destination to research and check out the details and boy did I spend a ton of time looking.  The best beaches, a great hotel and what all we could do while we were there.

I found a deal on Travelocity, it was around $1700 each for 7 days.  I was lying in bed and ready to book it and telling Danny all of the details.  He said to me, “Why only 7 days?  If you are going to go that far stay longer!”  Well, that turned the trip into 10 days and the final price was just under $2,000 each for airfare and hotel accommodations.  What a deal or at least I felt it was a fabulous deal and I booked it!!

I booked the trip for both of us and Ashley started saving so she could pay me back before the trip was here!!

This was truly the start of a new tradition for us!  We will be planning 2020’s trip soon.  Tring to figure out where we want to go next.  There are so many countries, cities and towns to explore and I hope that I’m blessed with the health to continue this for at least the next twenty-plus years.

Now, if leaving the country is not in your cards, don’t miss out on taking a mother/daughter trip even if it’s just for the weekend and only an hour or so away.

I have been very blessed to spend several trips this year with Ashley, but two out of the three were work trips.  We traveled to Illinois and Georgia.  We put booths together, talked to customers, showed them our wonderful products and returned home.  It’s always awesome to travel with her but this time no work, no customers, no booths to set up.  Just a lounge chair, a glass of wine and an island to explore.

Take the time to embrace the opportunity and spend time with family.  Whether it be your daughter or son, make plans!!

BTW… I love to travel, but I am also a bargain hunter!  Every trip I take is usually an amazing deal that I have hunted many hours for. So get your laptop out and start hunting for that amazing deal and book that trip! You will not regret it 🙂

PS: Be on the lookout for our upcoming blog posts all about our time on the island! Ashley will be sharing from her perspective about what we did every day, as well as our trip home through Zurich, Switzerland.

Just a couple teaser pics 🙂

First night arriving at our beautiful hotel!
First dinner in Santorini!
Breakfast with a view. Our first breakfast in Santorini!


Designer Epoxy Workshop

We are just about a month away until our first Designer Epoxy Workshop, and we are getting so excited! Rhonda and I have been collaborating this entire year coming up with the most fabulous finishes to teach you during this 3-day workshop in Seguin, TX.

This workshop is for anyone, whether you have played in Epoxy before or not.  We created this workshop so that no matter what level you are at, you will learn a ton of information and different techniques.

Make sure you add this workshop to your calendar and join Rhonda and I to take your Epoxy and Decorative Finishing to this next level! You will wow your family, friends, and clients with these incredible finishes 🙂

Workshop Dates:  October 10 – 12

Workshop Location:  Seguin, Texas

Need more information?? Head HERE 🙂


Custom DIY Bulletin Boards

This is such a fun and easy project that everyone can do! I think everyone needs to have a bulletin board in their home, office, or even dorm room. You always need a really cute place to “pin” those important papers, show off some really cute pictures, and hang those holiday cards you know are going to start showing up in the mail any day now LOL

I started with a bulletin board that I had purchased, who knows how long ago. I think I bought it for a class I was teaching years ago. Don’t you just love finding things around the studio that you can turn into beautiful works of art??

I grabbed some of my favorite DIY Paints, Seaglass, Mermaid Tail and Hey Sailor.  Then I got some water to dilute the paints to create a soft wash of color and create my own version of a color blend technique.

More of a visual learner?? You can watch the entire process below.

Once the background color was dry, I moved on to the frame. I decided I wanted to make it “pop” a little more, so I used the Hey Sailor DIY Paint color. I just brushed on two coats.

Then I had to break out one of my favorite stencils, Nora Paige. I stenciled the Nora Paige design with Hey Sailor and Crinoline DIY Paint colors.

You can watch the entire process below 🙂

Embellishing your bulletin/cork board is a lot of fun! You can customize one for your office, home, dorm room, the possibilities are endless. It is so easy with some paint and stencils! These would make the most perfect and special gift for all your loved ones 🙂

Here is another video I did on showing several different techniques on the unpainted corkboard!

I hope you enjoyed this project! I can’t wait to see what y’all create 🙂


Upcycling Furniture: A Fabulous Dresser

I have so many talented retailers that create some amazing projects and this one is sure to WOW you!

Morey Dunbar of PAINTED studio in Brookfield, IL has outdone herself with this fabulous dresser!

This dresser was actually a commissioned project that Morey transformed using foils and metallic paints!

The dresser was sanded, cleaned and primed with a grey primer.  It’s always best to base coat in a color that is similar to the foil color you are using or a darker color than the foil color you are using.

Morey taped off the areas that she planned to foil with the Cloud Foil.  First, she applied the ArtsSyVille Foil Adhesive and allowed it to dry to a firm tack.  Once the foil adhesive was ready, she transferred the Cloud Silver Foil to a couple of sections of the dresser.

Then she taped off the top of the dresser and the drawers. She applied the Foil Adhesive and transferred the Ramsey Rose Silver Foil. She then foiled the legs with Silver Foil.

After all the foiling was done, Morey broke out a stencil and painted Diamonds on the top of the dresser and the drawer fronts using Black and White paint.  She then hand-painted Teal polka-dots at the intersection of the diamonds for a splash of color!

To top off this fabulous piece, Morey added a little Metallic Plum!

We love the creativity of Morey and the combination of using different foils, stencils, and metallic paints!

Make sure to share your projects with us!  We are always looking for great projects to feature on our blog, Facebook and Instagram pages 🙂

Unleash your creativity and get foilin’!!!