Free shipping on orders over $100! **After discounts have been applied & Continental US only

Jennifer

Jenn’s Paint Group

If you have been wanting to increase your knowledge of products and learn new finishes that can be applied to endless amounts of surfaces (anything from walls, to DIY projects, to furniture), then this group is for you!

During the month of July… I will be teaching two new finishes in this group that are both focused on furniture and cabinetry, but could also be adapted to other surfaces.

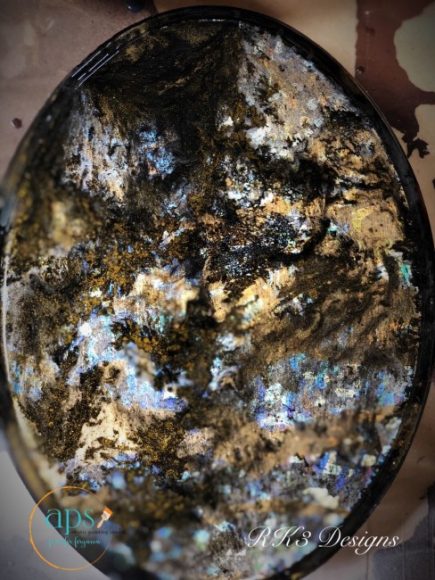
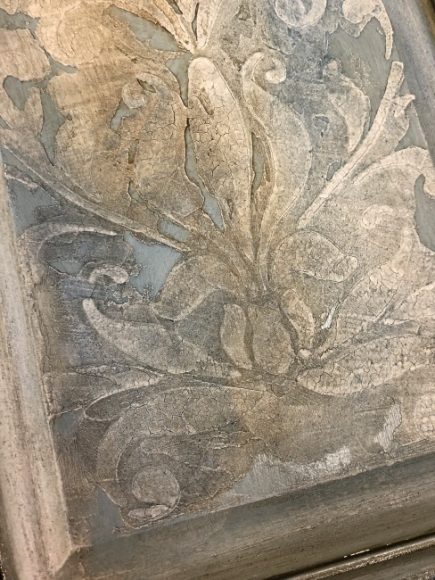
The Pemberson Finish is a classic and the classics always stand the test of time.  This elegant finish would be fabulous on any piece of furniture as well as cabinetry.  I can especially see it in a bathroom vanity.

The Pemberson Finish

I will be taking the group step-by-step through the process on July 1st (by the way that’s my Birthday) during a LIVE training in the private Facebook group. If you miss a LIVE, don’t worry, you can watch the replay in the group or always catch it later on the Members Only Site (more on that later)!

In the training videos, if you are able to catch a LIVE, you have the opportunity to ask questions any and all questions you may have during the process. I absolutely love the interaction!! If you aren’t able to catch the LIVE, you can always post questions later in the group as well and I will always answer those as well.  I will take the class through each step/process explaining the technique as well as showing and applying the process.  I am super organized and explain everything in depth!  Every step is prepped in advance (so no watching paint dry) for each video and can take anywhere from 30 to 60 minutes showing the process depending on the complexity of the finish.

Up 2nd for July will be The Parkhurst Finish!  Here again, is a great finish for furniture/cabinetry, but this time we are going to get on the crusty side.  I love 2019 for the diversity in finishing.  It seems just about anything is a go right now.  From Contemporary/Modern finishes to Old World crumbly/crusty finishes, you just gotta love it!!

The Parkhurst Finish

So…  On July 15th we will be exploring this crusty/crumbly Parkhurst finish.   Again, I will take you through the process and show you all the steps to create crusty awesomeness!  You don’t want to miss this one!

The Parkhurst Finish

Then as a special bonus video for the month of July, we will have a pre-recorded video with Jenn & one of our founding members Katherine Netzinger!  Katherine will be sharing her process that she used to transform an old chest.  This will be fun as Katherine takes us through her process.  She will be Rocking the Crocodile Roller in this finish.  You can look forward to this bonus video around the 24th of the month.

Last but not least, we have created a Members Only Site (now I say “we” but what I really mean is my son, Tyler, made my crazy idea come to life)!  The Members Only Site is the Home for all your training videos.  Here you will find all the videos that have been taught during “your” membership, very neatly stored on Your Dashboard.

Just open the tab for the period you want to search and they will all be listed during the months they were taught.  Just click on the video tab and you can watch as many times as you would like, you can read through the written instructions and/or print them to create a file of your finishes.

We also offer our members the opportunity to browse through the Finish Library, which houses all the videos that have been created during the life of this painting group.  You can purchase any of the prior videos (at a members-only price) and it will show up on your Dashboard.  So if you are a new member, you can always grow your own personal library as desired.

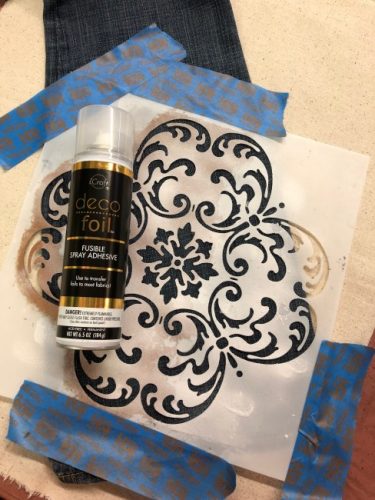
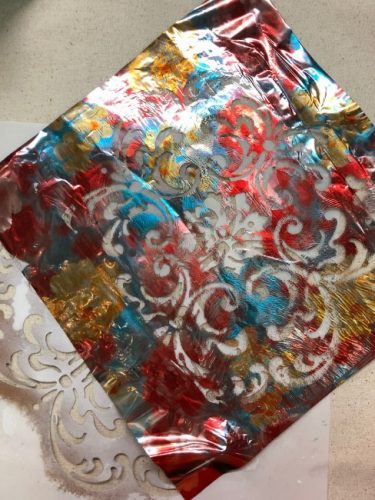
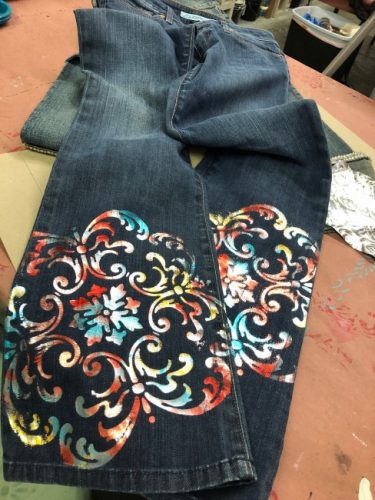
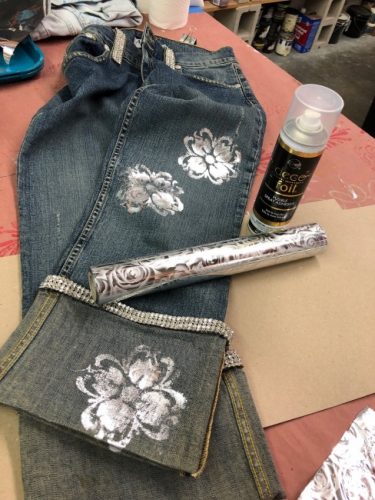
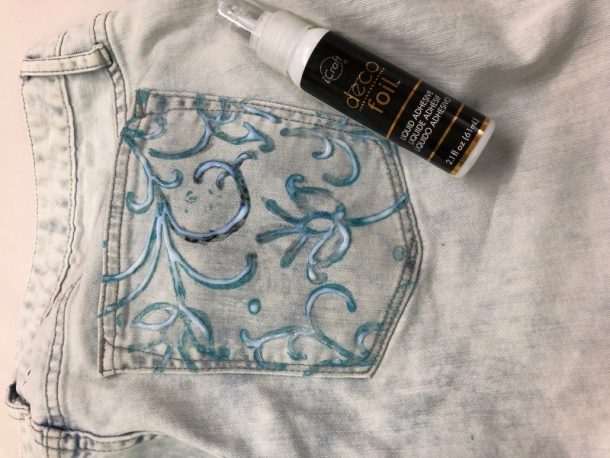
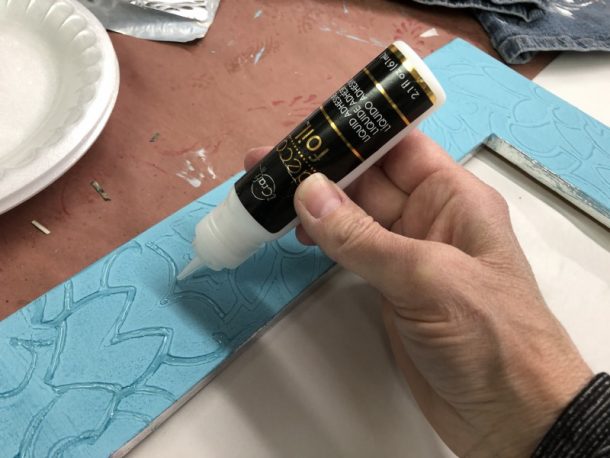
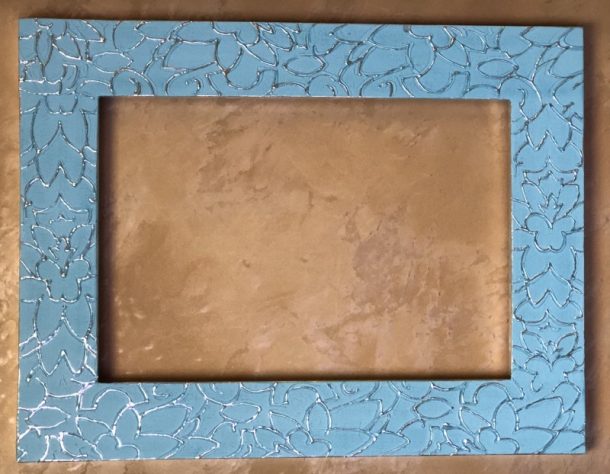
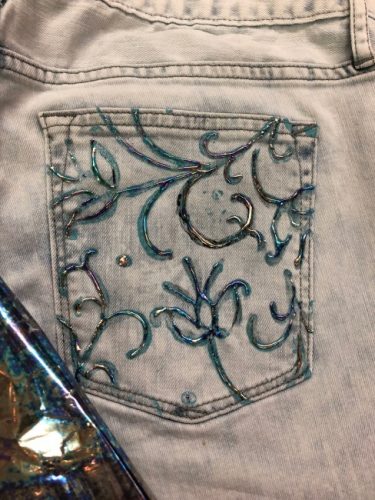
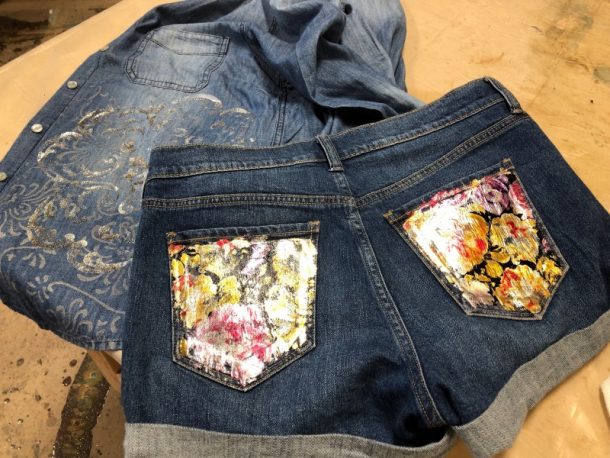
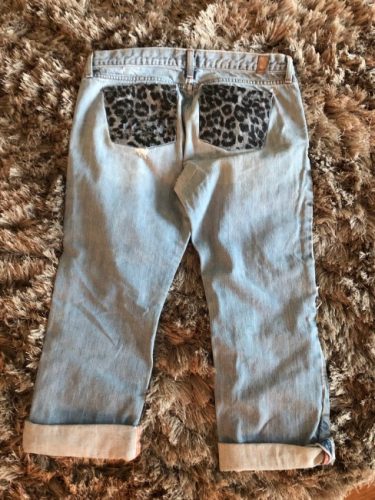
The private Facebook group is where I will always be teaching LIVE or posting a pre-recorded video.  It’s where you can post all of your questions and I will always available to this group to answer them.  Where you can share your projects, interact with fellow members, get help/advice or share anything creative related.  Every quarter in the group I have a Challenge Project for the members.  This past quarter was all about Foils and I challenged members to use them on a project.  These projects will be featured during the first week of July!

We hope that you will check us out!  It’s only $47/month and you can leave at any time (but I’m sure you’ll want to stay 🙂 ).  During the month of July, we are offering a special for annual membership purchase.  If you join for the year, we will unlock all of 2019 training videos for you!  That’s a bonus of 6 months of videos WOOHOO! 🙂  (Annual Membership purchase only)  What a bargain for only $470! Don’t forget, Doors open July 1st!

PS: You can signup for the waitlist HERE!

Epoxy 101, Advanced Color & Technique, Designer Epoxy Finishes and More…

Well… The Epoxy bug finally got me!!  I’ve been intrigued for a while, which means I have been researching, watching, playing, creating for a year or so now. But… sometimes I am a little slow to jump in!  I’ve been so fascinated with the process and what all you can create thanks to Rhonda Dracolis of RK3 Designs.

And… Drum Roll Please!! I’m very excited to share that Rhonda and I have teamed up to bring you the fabulous world of Epoxy.  We are going to be co-teaching several different classes on the art form this year. 

We actually have two starting points for you.  You can either dive into our Epoxy 101 two-day course or jump into our Designer Epoxy Finishes course.  Either workshop is designed for any level whether you have never touched epoxy before or you’ve been in the game for a while now.  Both workshops are designed to get you started and expand your knowledge.

Epoxy 101 

This is the recommended course to get started in epoxy finishing.  Whether you want to re-do your countertops and/or create some fabulous DIY projects, this workshop will get you off and going.  Rhonda and I will be taking you through all the fundamentals of working with epoxy as you learn several basic finishes that are easy to recreate. You will learn everything about an epoxy pour, from mixing, coloring, and creating.  We even have heat guns and blow torches!  During this two-day workshop, you will create many sample boards as well as a group project. This course is one of your best investments to learn everything epoxy. This class runs $600 for the two days. You can also bring a plus 1 for an additional $100 (your plus one and you will work on the same boards and play together).

Advanced Techniques & Color

This workshop is really your next step and most students will want to add this onto the Epoxy 101 class and just stay for the complete three days!!  The one-day workshop is going to take you deeper into creating with epoxy. More advanced techniques to take your epoxy finishes to the next level. Rhonda and I will be sharing more techniques on how to work with and manipulate the epoxy and create layered finishes.  This one-day class runs $350 but those taking the two-day workshop can add this on for only $200 more (what a deal!!). You can bring the plus one for an additional $50, and again you share the same boards and work as a team.

Designer Epoxy Finishes

Now for those creative folks that just don’t want to play in Epoxy only…  Rhonda and I have been creating on another level for you!  Incorporating different materials into the epoxy to create more unique finishes! So plan to join us for this three-day Designer Epoxy Finishes workshop.  No matter what level you are at, we have designed this workshop to get you up to speed.  This course includes Fundamentals training to provide the basics of working with epoxy and then we take it to another level.  You will enjoy the creativity that is applied in this workshop, taking different materials and using them to enhance your epoxy knowledge. Plan to join Rhonda and I as we unleash the artist within and share our many years of knowledge.  This workshop is $950 for the three days.  You can also bring a plus 1 for an additional $150. The plus one and you will work on the same boards and play together.

Below are the links to the different workshops to check for dates and locations.  Yes, we are teaching in Huntington Beach, CA, and Seguin, Texas this year to make it convenient to join us no matter where you live!!  Hospitality is always a must, but now you can choose to either have the Beach Life or the Ranch Life depending where you join us!!

Designer Epoxy Finishes – August 1st – 3rd – Huntington Beach, California

Designer Epoxy Finishes – October 10th – 12th – Seguin, Texas

Epoxy 101 & Advanced Color Technique – October 31st – November 2nd – Huntington Beach, California


Three New Foil Adhesives

Well, guys and gals, if you haven’t heard by now we have three new Foil Adhesives for Fabric! I’m just a little excited about this 🙂  I’ve been searching for a fabric foil adhesive for almost two years! But, I feel I have hit the jackpot and it was well worth the wait! These adhesives are such GAME CHANGERS and they’re all washable!

All three of these fabric foil adhesives are different and I am going to lay out all the details for you to make this as easy as possible… So let’s get started with my FAV!!

Fusible Spray Adhesive:

I love using this product with stencils it works fabulously!! First, make sure to shake the can really well, not just one or two shakes, but shake it for at least 30 seconds!

Grab one of your favorite stencil designs and spray the back of it with a repositionable stencil spray adhesive, we carry Stick It. You need the stencil to stay completely sealed/stuck to the fabric because we don’t want any spray to get under the design. Position that sticky stencil on your favorite jeans, t-shirt, pillowcase, etc. and then tape around the edges to provide you with a little extra border so that you don’t get any “over-spray”.

Now it’s time to spray the Fusible Spray Adhesive. Again, make sure the can has been well shaken and then just spray over the stencil openings and make sure to cover all the openings. Remove the stencil and let it soak in “Awesome” Spray Cleaner (y’all can find this at the Dollar Store) and allow it to soak overnight. Then the Fabric Spray Adhesive will just wipe right off of your stencil!

Allow the Fusible Spray Adhesive to dry for ten minutes and then lay your favorite foil pattern or color over the design. Make sure to cut a piece of foil large enough to cover the complete design or use several pieces of foil to cover it completely. Then take an iron and iron for around 30 seconds – test your iron temperature (high is recommended, but everyone’s irons are different).    Use Parchment paper and iron over the design moving the iron around the area slowly while using the steam as well.   Keep repeating this until you have ironed over the entire pattern.

Once you are done with the ironing part, you need to allow the foil to COMPLETELY cool off. This will take a few minutes but just be patient!! Once it’s cooled off,  just peel off the foil and it will have transferred to the stenciled design!!

We can customize anything with foil and stencil designs – create jeans, shirts, and home decor!!

This is completely washable! Coldwater, inside/out and hang dry! NO DRYER!!

Liquid Foil Adhesive:

For all you artists out there, y’all are going to love this! You can just free-hand draw anything you want and on fabric which is so fun!! This product has a fine tip that you squeeze the product out of and it stays a “three-dimensional” beautiful round line (well that’s if you squeeze that steady) but it will stay round and not level out.

Now if you’re not an artist, don’t worry I have figured out a couple of great ways to still use this great stuff!! First, use one of my amazing rollers to create a pattern on anything and then you can outline the design with the Liquid Foil Adhesive. This is so easy anyone can outline!!

You can also stencil a pattern on your surface and then outline the stencil design 🙂 I love this stuff on fabric, wood and note cards!!

Once you create your design, the Liquid Foil Adhesive will be milky white in appearance and it needs to dry until it’s completely clear and this will take an hour or so. Be patient, it’s worth it!!

Once the adhesive is dry all you need to do is lay your favorite foil over the design and just rub the foil. YES, I said just rub the foil! NO ironing or anything else! You can rub with a cloth or if that’s not enough, try a scrub brush.

That’s it, so easy peasy!! But fabulous 🙂

Now we are on to the last but surely not least…

Transfer Gel:

This stuff is in a little jar and you can paint it onto your clothing 🙂 For those artists out there, y’all can get as creative as you want. Grab a paintbrush, I picked some that had stiffer bristles because this product is a little thick, and painted away. Free-hand whatever you would like!!

Now for those that haven’t discovered the artist within yet, you’re not out of luck with this stuff. There are still some fun ways to use it!

First, just tape off the pockets of your jeans and brush 100% coverage over the surface and make sure you have a nice coat of the Gel. I also created a jagged edge to the bottom of my jeans, but you can create stripes just by taping off and so many other options.

Once you have brushed the Transfer Gel onto the surface and let Gel dry for 1 hour or until completely clear. Cover the painted area with your choice of foil (I used Cheetah Silver Foil) – make sure to have the pattern side facing up.  Cover up the foil with Parchment Paper and then take an iron and iron for around 30 seconds – test your iron temperature (high is recommended, but everyone’s irons are different).   Iron over the design moving the iron around the area slowly while using the steam as well.   Keep repeating this until you have ironed over the entire pattern.

Once you have ironed over everything, allow the foil to completely cool (be patient) and then just peel it off. AMAZING!!!

I have been playing with a lot of clothing, but I’ve started some fabric for a pillow and there is much more to come.

Hope this information helps you with the details of using all of the new Fabric Foil Adhesives! Looking forward to seeing all the creative projects that will get made by all of you talented peeps!

Have fun foiling!!

Products:

Fusible Spray Adhesive

Liquid Foil Adhesive

Transfer Gel


All My Business Favorites

People are always asking about the different things I use in my business, so I figured I would put them all in one spot for everyone! These are different programs, websites, tools, and more that I use to keep organized and run my business.

If you have any questions about anything below, please feel free to email me at jennifer@artisticpaintingstudio.com. These are all products and programs that I or my team personally use and help us run my business smoothly. 🙂

Staying Organized:

I have to have a pen and paper to stay organized! I can’t just put stuff in my computer calendar or the calendar on my phone, so I love a good day planner. My favorite is Day Designer 🙂 They have so many cute patterns and so much room to write ALL THE THINGS I need to get done!!  I also love that there is a place to write down your Gratitude each and every day!

Social Media and Email Marketing:

Here are a few platforms my team and I use for all things digital marketing 🙂

Canva: A fantastic tool for creating graphics! My team uses this website to create graphics for Facebook, Instagram, Instagram Stories, Facebook Banners, Email Banners and so much more. There are tons of awesome templates to choose from so you never have to start from scratch.

Ontraport: This platform is INCREDIBLE and worth every single penny!! We use Ontraport for email marketing, landing pages, opt-ins, our monthly membership groups, and more. It is a one-stop shop and their customer service is AMAZING! Such an awesome company to work with and they are always updating and coming out with new features.

Tailwind: If you are on Pinterest, you NEED Tailwind. It lets you schedule your pins and loop them so you are always posting new content and staying active on Pinterest. It also has great analytics! This app/website makes it super easy to plan ahead of time. You can schedule pins for a week, month or more and not have to worry about it! You can also schedule your Instagram posts as well! Such a great tool to help you get organized and not have to spend as much time on those social media platforms 🙂

Facebook Lives, Instagram Lives, and YouTube Videos:

If you have been following me long, you know I absolutely LOVE doing Facebook Lives and have been adding quite a few new videos to my YouTube Channel. Most of my team doesn’t live in Huntington Beach (they work remotely), so I have to make these videos on my own. Some of my favorite tools that have helped me create videos on my own are:

Tripod: You definitely need a good tripod! I really like this one.
Tripod Holder: You need something to hold your phone. LOL! This one works great!
Desktop Tripod: When I am recording business training videos, this one works great!
Selfie Stick: Sometimes you just need a good selfie stick for creating videos around your studio. This one works really well.
Gooseneck Phone Holder: This holder works great for working on projects around your studio or job site. You can just clip it onto anything nearby where you are filming.
Diva Light Ring Discount Code: JF7Y6R2T – This light works fantastic!! Lighting really can make or break your video, the better the lighting the better quality of the video (visually of course).

What are your favorite tools for staying organized and running your biz??? I would love to hear about them!! Email me: jennifer@artisticpaintingstudio.com


**This post may contain affiliate links that, when used, will provide me a commission paid for by the company and not you. 


DIY Frame: Make Your Own Chalkboard or Corkboard

You will want to start with just a simple frame. I found one that is notched on the reverse side so that I can insert a chalkboard or corkboard when I am finished.  Then I got out my favorite product Texture Medium!  This time I applied it with a “chip” brush.  This makes it so easy to apply, no need for a trowel if you don’t already own one, and it created a very nice Stria finish.  

Here is a video showing the process:

Once the Texture Medium was applied, I used the Lotus Roller to create a beautiful carved pattern. Allow the Texture Medium to dry and then do a light sanding to remove the “peaked” areas that are rough.
Now it’s time to add some paint.  I grabbed some of my favorite colors from Debi’s Design Diary DIY Paint: Seaglass and Mermaid Tail.  I painted the entire frame with Seaglass and then “dry Brushed” on the Mermaid Tail to highlight the design.

Here is a video showing this process:

Here is a video showing dry brushing – it’s just a short time-lapsed video:

Then it was time to add some foil 🙂  You know me, every project lately has to have some foil!!  I used my regular ArtsSyVille Foil Adhesive and applied it to the inside and outside edges.  This has to dry for about 30 minutes to get to a firm tack.  Once the foil adhesive is dry, you can transfer the foil.  I used Silver Foil.  Then I decided to get out one of my new Foil Adhesives, the liquid adhesive, and outlined some of the pattern.  I wasn’t really sure where I was going with this project, so I only outlined the opposite corners.  The Liquid Foil Adhesive has to dry for at least an hour or so, until it’s completely clear, so we just had to wait on this part of the project.

Here is a video showing you the process:

But once I stepped back and looked at the frame, I decided to outline all of the design.

Here is a time-lapse of the process:

With all of the design outlined with the Liquid Foil Adhesive and allowing it to dry for a couple of hours, it was finally time to finish this beautiful project!  And OMG the Silver foil looks absolutely amazing over this foil adhesive.  It looks like liquid metal 🙂  When transferring foil over this product, you just have to allow it to dry completely and then transfer the foil by rubbing or using the scrub brush.  Make sure to always have the shiny side of the foil facing up and just rub or scrub the foil to transfer to the Foil Adhesive.  That’s it, such a simple process.  Since this product comes out as a raised image that’s round, it looks like I poured liquid metal! So stinking cool 🙂

Here is the final video showing you the process:

List of Products I Used:

Texture Medium
Lotus Decorative Roller
DIY Paint:
Seaglass
Mermaid Tail
Foil Adhesive
Silver Foil
Liquid Foil Adhesive

Why I Love Young Living…

Since my daughter got me hooked on essential oils a year ago, I can’t stop using them! LOL! At first, I was a little skeptical but wanted to support her when she started doing the Young Living biz, so I got myself a kit. Then… I started to see the positive effects they were having on me!

I was diagnosed with Ulcerative Colitis (UC) a couple of years ago and this is the healthiest I have been since being diagnosed. I am definitely not saying they “cured” me, but man do I feel good these days! They give me sleep support, emotional support, digestive support, immune support, you name it, they support it!

Fav Oils for Sleep Support:

Lavender

Peace + Calming

Cedarwood

Orange

Fav Oils for Emotional Support:

White Angelica

Sacred Frankincense

Valor

Fav Oils for Digestive Support:

Peppermint

DiGize

Fav Oils for Immune Support:

Thieves

Oregano

Lemon

Frankincense

Now through the end of May, when you grab your kit you get a full-size bottle of Thieves Household Cleaner (smells like heaven & toxin free) and a beautiful glass spray bottle for FREE!

What Comes In Your Premium Starter Kit

+ 12 Oils

+ Diffuser

+ 2 Packets of Ningxia Red

+ Sample of Thieves Household Cleaner

+ Thieves Hand Purifier (healthy hand sanitizer)

+ Full-Size Bottle of Thieves Household Cleaner (Sign-Up by 5/31)

+ Glass Spray Bottle (Sign-Up by 5/31)

+ Welcome Package & Goodies From Me

+ A Community That Teaches You All About Oils!

All for ONLY $165!

Grab a Premium Starter Kit HERE!

By signing up through me, you will join my team + get so many incredible resources + the community you always wanted! You get access to our private Facebook groups + we teach you everything you need to know about your oils and you can ask ALLLLL the questions (I know I did when I first got started 🙂 )

Grabbing your starter kit is simple! Simply click here & follow the 5 steps below! 

1. Check “Wholesale Member” (this is very important!) rather than “Retail Customer”. This doesn’t mean you have to sell oils, I promise! It simply gets you your kit + a 24% wholesale discount for the year.

2. Choose the starter kit w/the dewdrop diffuser or desert mist diffuser (unless you want to upgrade to the rainstone or aria!)

3. Now, you can choose to set up a monthly “wellness box”, called Essential Rewards. It is hands down the best way to begin a toxin-free lifestyle + receive Sooooooo many freebies/rewards points in the process! It is like Christmas EVERY. SINGLE. MONTH. when my box comes in the mail!

Some of my favorites to add to my ER order each month are:

Thieves Hand Soap // The best smelling hand soap that ever existed! Think Christmas year round!

Ningxia Red // The BEST antioxidant drink! I drink 1 ounce every day to keep me healthy 🙂

Copaiba  // This is a great oil for inflammation support! I take this oil in a capsule every day.

Thieves // I know you get this oil in your starter kit, but this is an oil I NEVER want to run out of! King of all immune support!

4. Enter all of your info! Create a username, password, and pin. Write these down so you have easy access to the site again!

5. Check out, confirm you got all the way to the confirmation page, + get super stoked you’re about to start your oily journey!

So stinking excited for you to get your kit & become a part of our oily community!!