Free shipping on orders over $100! (Continental US only)

Jennifer

DIY Rustic Farmhouse Sign

This project was not only super fun but is a great addition to our entryway! This DIY rustic farmhouse welcome sign can be hung by your front door to hold keys, hats, or even a coat!

This project started with a dangerous trip to Hobby Lobby LOL! Y’all know what I mean…  It never fails that I go there for one or two items, and I come home with a truckload!

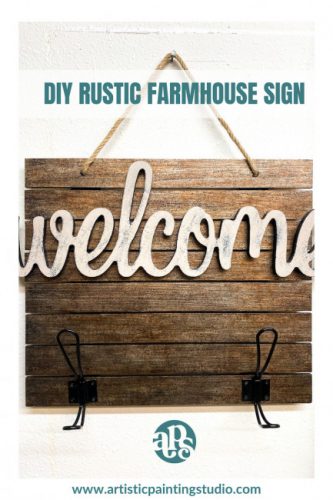
Rustic Farmhouse “Welcome” Sign

The wooden plaque and welcome wood letters came from Hobby Lobby and the hooks were purchased from Amazon.

You will start by base coating both the plaque and welcome in the Bondago Black with full coverage.

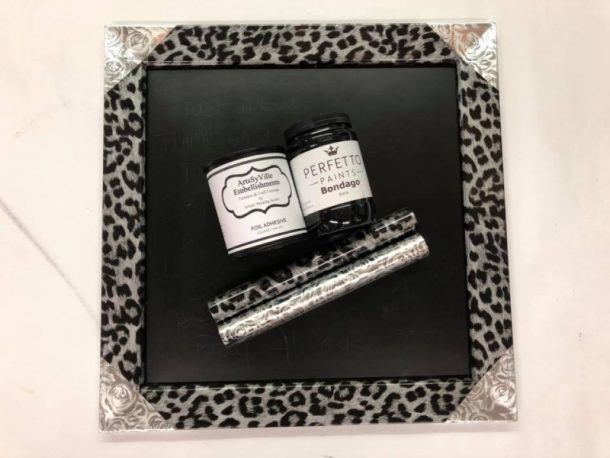
Once your basecoat is dry, you will apply your Foil Adhesive to the top side of the plaque. Allow the foil adhesive to dry for at least an hour until it drys to a firm tack.

Once the foil adhesive is dry, you will transfer the Indian Bronze metallic foil or any color you like best.  Lay the foil over the surface with the design side facing up and rub/scrub the surface with a plastic bristle brush.  This process will transfer the foil to the surface.

Now, let’s work on the wooden “Welcome”

Since we’ve already base-coated the letters in Black Bondago we are ready for the next step. I painted the topside only with DIY Paint in the color Faded Burlap and allowed it to dry.

Next, I distressed the faded burlap using cheesecloth and water.  Just spray the cheesecloth with water and rub the surface. Remove as much as you want to distress the paint.

Finally, you will topcoat everything with your favorite product. We love to use Golden Paintworks Topcoat, Modern Masters MasterClear, and Final Coat.

Glue the “Welcome” to the plaque and add some decorative hooks!

You can add a rope to hang or attach to the wall with screws.

Xo, Jenn

DIY Planter Chair Tutorial

If you have an old chair that has seen its better days, this is the perfect project! This was an old chair that had a few different finishes over the years, and I really wanted to create another DIY planter chair.  I had a few of these years ago and thought it would be wonderful in front of my studio!

DIY Planter Chair Tutorial

I first sanded off the old finish and primed the entire chair with Bondago to start off the project.

Then I painted the entire chair with DIY paint Old 57. Apply as many coats that are necessary to create the coverage you desire.  I painted two complete coats for opaque coverage.

Once the Old 57 was dry, I brushed on our Foil Adhesive over the floral design on the top slate of the chair.  Make sure to allow the foil adhesive to dry for about an hour or longer.

After the Foil Adhesive dried for an hour, I cut some small pieces of the Teal and Pink metallic foils.  I then scrubbed the foil over the areas I wanted to apply the foils to using a stiff toothbrush.  I created this to be more of a distressed finish by not trying to transfer 100% of the foil, allowing the base coat to still show.

I finished the chair by using General Finishes Exterior Top Coat. I applied several layers to protect the chair well.

Now it’s time to add flowers! 

I used chicken wire and a staple gun to attach the chicken wire to the chair. Make sure to glove up for this step so you don’t cut your hands.

I lined the chicken wire with moss and then planted the chair with some seasonal flowers.

This was such a fun project and it’s a great way to welcome our customers to the studio! Have fun making a planter chair for your home or office!

Xo, Jenn

Custom DIY Chalkboard

Sometimes you have awesome home décor items lying around the house but they need an update! This was a Pottery Barn chalkboard that received a few dings during a move and needed an update for the new home! I decided to turn it into my own custom DIY chalkboard and I am so excited to share this tutorial with you today.

Custom DIY Chalkboard

First, you are going to tape off the chalkboard so you don’t get any products on the surface of the actual chalkboard surface.  Then you will paint the frame with Bondago paint/prime in the color black for a great base coat.

Next, grab some of your favorite foils and get to work!

First, you will apply our ArtsSyVille Foil Adhesive to the entire frame. Then I used a quilters ruler to mark off the corners so that I could get them all the same. I wanted the corners to have a different pattern than the rest of the frame.

Then I used our paper cutter to cut straight edges on four pieces of foil to do the corners with the Ramsey Rose Silver foil.  I left those pieces of foil in place and then I applied our Cheetah Silver on the rest of the frame. I scrubbed all the Cheetah Foil on first.

Scrub one section at a time and release the carrier. Once all the sides are completed, then finish scrubbing the Ramsey Rose on the four corners. (Watch the video tutorial above for further instruction 😉)

Custom DIY Chalkboard with black and silver colors and prints.

To protect your foils, you will want to seal them!  I used Final Coat and applied several layers.

Hang up and enjoy your newly updated home décor and write fun notes for family and friends!!

Xo, Jenn

Custom Epoxy Tumbler

Creating a custom epoxy tumbler is one of my favorite projects!  You can find tumblers everywhere (Walmart, Amazon, etc.) and I personally prefer to buy ones that are colored.

I try and order the colors I want to work on even though I’m going to prime them as well.  Yes, it is important to prepare the surface and prime for the best results.

Custom Epoxy Tumbler

First thing I always do is sand the surface to get a little “tooth” and then clean with Alcohol.  After this, try to keep your hands off the surface as to not transfer any oils back to the surface.

Then prime your tumbler. I love working with Bondago Paint & Primer all in one or Rust O-leum 2X paint/primer as my base coat.  I always choose a color that will complement the foils I will be using.  Allow this basecoat time to dry for several hours.

Then you will want to apply a layer of our Foil Adhesive to the surface. You will brush this onto the tumbler and if needed, you can add a little water to the foil adhesive (maybe 1 to 2%).  The water will allow it to brush on smoother.  Allow the foil adhesive to dry overnight for best results or at least 2 to 3 hours.

I used one of our most popular metallic foils, Copper Green Slade.  You will lay the foil out (pretty side facing you) and transfer to the surface by rubbing or scrubbing with a plastic bristle brush.  Remove the carrier once the foil has transferred to the tumbler.

Now it’s time to mix up our Liquid Glass Epoxy. I like mixing in one container adding B first and then A of equal parts.  Mix up well using a stir stick, mix for at least 2 minutes.

I added some Gold Dust to the epoxy for a little added bling. This is just an option, you do not have to add the gold dust.

Then using your gloved hand or a foam brush apply the epoxy to the tumbler as it is spinning on the cup turner.  Make sure all areas are covered well and check as it turns.

I used a blow torch to bring all the bubbles to the surface and clear the epoxy while it spun. Then you will leave your tumbler spinning for about 7 hours or overnight.

I recommend applying two coats of epoxy for the best results.  Lightly sand first coat, clean with alcohol, and apply another coat of epoxy.

Allow your tumbler to cure for 30 days for best results! This will allow the epoxy to achieve its hardest film and it will last longer.

Now it’s time to enjoy your favorite cold beverages in your new one-of-a-kind tumbler! These have been so fun to make and I use them all the time!

Xo, Jenn

Custom Pillow DIY: Stamping Rollers

It’s time for another super fun & simple craft project! This custom pillow DIY will show you how to create custom throw pillows to match your aesthetic perfectly. Let’s get started!!

Custom Pillow DIY

Custom Pillow DIY: Stamping Rollers

First, I color-washed the background of the canvas with Hey Sailor DIY Paint. I diluted the paint with water to create a washed looked.  You will paint both sides of the canvas and allow it to dry.

Next, using the Chrysanthemum Stamping Roller, you will load the foam roller with DIY Paint White Swan and then attach the pattern roller onto the handle.

Line up the roller on the dry pillow cover and roll on the design. Lining up one roll after another.  Roll both sides of the pillow cover and allow it to dry!

Such a fun project! Just think of all the things that you can customize with these great rollers!  Sheets, window treatments, table runners, placemats, etc. The list goes on and on!

Have fun Crafting!

Xo, Jenn


Mini Custom Foiled Pumpkins

Fall is here, which means it’s time to decorate for the season! Luckily, Dollar Tree has all of your pumpkin needs covered. Today we will be transforming mini pumpkins into fabulous home decor. These are affordable and easy to make so they can fit any budget or skill level.

Mini Custom Foiled Pumpkins: It’s Fall Y’all!

I love decorating with these small pumpkins that I found at the Dollar Tree and decided they would be perfect to paint and foil.

These were base coated in Bondago Black and allowed to dry overnight or for at least a few hours.

Then I grabbed some of our fabulous Foil Adhesive and painted the adhesive onto the pumpkins in a checkered pattern. These are free-hand and not perfect but it still looks amazing. Just follow the pattern I created in the video and then allow the adhesive to dry for at least an hour!

I used Orange Foil, but you can use any color you want for your decor. Cut the foil into small pieces so that you can easily transfer it to the small squares that you painted with the foil adhesive. I used a stiff toothbrush to scrub the foil and transfer it to the pumpkin surface.

The foils are amazing a give such a beautiful sheen! Make sure to finish the pumpkins with a layer of topcoat. It’s best to use a gloss or semi-gloss for this project to let your foils shine.

You can use these small pumpkins to decorate your home this fall: a wreath for your front door, your mantel, or even a centerpiece for your table! The possibilities are endless! I cannot wait to see what you create 😁

Xo, Jenn