Free shipping on orders over $100! **After discounts have been applied & Continental US only

Jennifer

Too many stripes…….

I have this problem and basically not knowing how to say the word “NO” and once in a while, you wish you had said NO.  This was a project that I thought – no big deal, this will be easy to paint!  HAHAHA

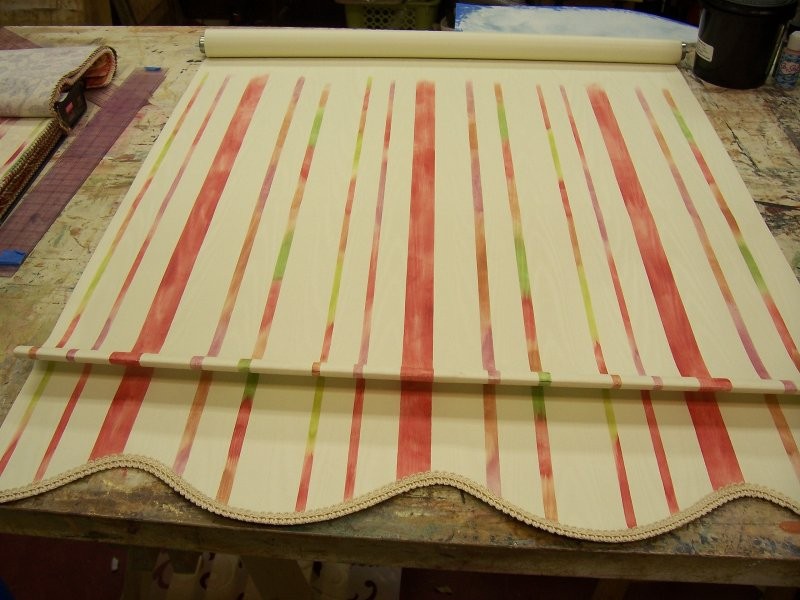
My client wanted to replace her pull-down shades with a fabric she fell in love with – but, the fabric was discontinued.  So, she asked me if I could paint the shades to match the fabric that she so loved.  No problem, it’s just stripes of colors………..SO MANY STRIPES!!!

There were three shades to paint and it just seemed like it would be so easy – just mark them off and paint…….well, it was a whole lot of blue tape.

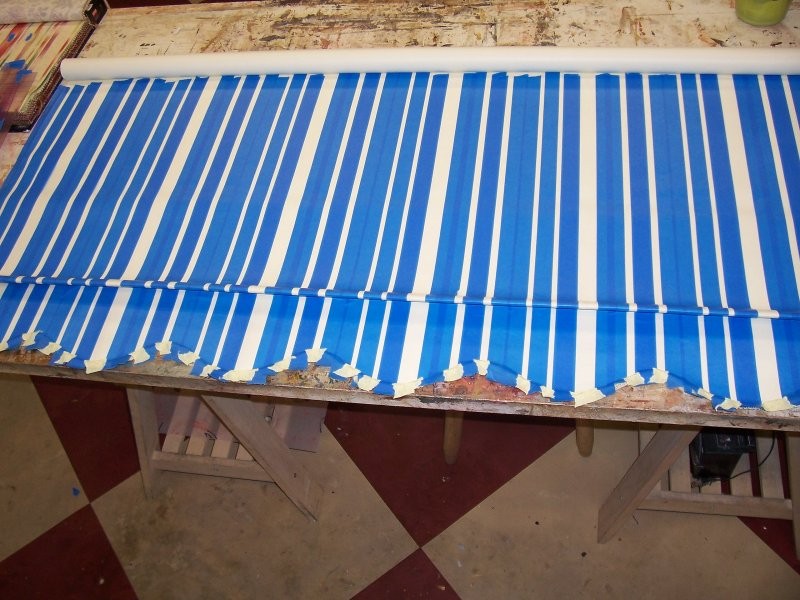
Just what was I thinking – after many days of taping painting and re-taping and painting and re-taping………I just thought this would never end!

It never fails for me – when I think it will be a quick and easy project……well, it just isn’t!!! 

Client loved them – matched fabric perfectly and looked beautiful in her home!  Never again!!!  LOL

Spectrum Salon

This was a fun project that I had the opportunity to create for Pam Nelson/Owner of Spectrum Salon. Pam had been updating the entire salon with the assistance and direction of designer Kris Enzenbacher. I was brought in for the artistic touches that needed to be added here and there. This is a wonderful Salon that has been around for many years and I also get my hair cut there……

Kris provided her ideas and drawings and I went to work on putting them into place. The Salon was getting a make-over with a more contemporary feel…….and I was to create some fun large swirl designs on several walls.

I love it when designers have creative ideas and energy to work with……great fun painting!

Blogging Once Again

It is amazing how life can get in the way of living and for the past couple of years….I feel I have just been existing. But, with many things behind me, it is time to live and enjoy life once again and I’m planning on just that – living life to the fullest!

I feel that I have my head screwed on right and I’m more focused than I have ever been. I’m so looking forward to my future and the future of my business. I’m very excited about everything these days – it seems there have been so many changes to our industry over the past couple of years and it’s time to embrace the changes and more forward with them.

I’m looking forward to once again sharing ideas, projects, information and much more here through my blog as well as on my Facebook page. If you’re not my friend yet – please feel free to “friend” me @ Jennifer Weber Ferguson and also make sure to “like” both my business pages Artistic Painting Studio and The Stencilled Garden.

Looking forward to staying in much better touch and bringing inspiration to the decorative painting community!

Blessings, Jenn

Studio Project

We moved to our new location December of 2006 – the building that we took over had a great layout, just needed an artistic touch.  But, even before we could add that artistic touch – we first installed our RSCrete floor through most of the building – entry, hall and classroom. After the floor was installed, we could at least move in and work on everything else later. My husband (Jim) and I floated all the walls and ceilings throughout all rooms – we went through a few gallons of TexturFil® to say the least. But, at least when I found time and inspiration – my surface was prepped and I could just start working. We also had crown molding and baseboards installed throughout all rooms – just another surface to enhance!!!

I haven’t run out of surface area yet – so, here is one of the finishes that was installed in the entry of the studio. Due to the fact that I can’t figure out how to add pictures where I want them in the post – you will have to view the”gallery” at the top of this post.

The first picture is the completed “Royal Wedding” finishing, with the second picture a close-up of the finish. I have also included pictures of the process – so that you could better understand the process of embossing a stencil design in plaster.

I first base coated the wall with Faux Metal® this is a product by Faux Effects™ – the Faux Metal was troweled onto the surface, which provided a rich gold undertone for the finish.  Had to allow this to dry for several days – that is one thing I have discovered about the Faux Metals® – they take a couple of days to dry – even more in the winter months.

Once the base was dry I then began to layout the all-over-repeat stencil design that I was going to use.  I pre-marked all the registration marks onto the surface – I use the blue tape (2080) and mark the registration holes onto the blue tape – this way there are no marks to remove later.  I made sure that the design was staying level, by using a level as I marked all the registration holes.  Pre-registering is necessary when creating with any material that will not dry immediately – this will allow you to jump from one section to another and allow the previous embossed areas to dry.  (With the way this stencil is designed and most stencils for an all-over-repeat – the stencil will over-lap wet work – so it is necessary to jump around the wall or room to allow everything to dry).

With several of the photos, you can see the progress of the project.  The wall wasn’t very large, so I was only able to create several repeats at a time…….clean the stencil…….and wait a couple of hours.  The product that was used to emboss was – LusterStone® another product by Faux Effects® – color Mandarin Red.  The time frame was several days to complete the wall – mostly due to the fact that it was at my studio and I kept getting distracted with other projects!

The final step was using RS WaterWax® – yes, another Faux Effects® product!!!  This is one of the finishes that I teach in my Designer Walls III – RSSeries workshop.  You can check out more samples of RS Series finishes @ www.artisticpaintingstudio.com – just click on classes.

Just a couple of notes on embossing with a stencil – the one used in this finish is my design (one of my newest under – Black & White Collection).  All of these stencils are single overlay and cut in 10mil mylar – which I believe is the best to use for embossing.  I always use spray adhesive to hold all parts of the design in place (when troweling material over them – it’s easy to lift the stencil and have bleed-under) – pre-mark all registration holes so that you can move around the area without waiting for product to dry.  I apply the material usually with a trowel – don’t put too much onto the trowel and only on the edge you are using (I’m a right handed person – so I load the right side of the trowel) – trowel over the open areas of the design and leaving material in the stencil openings. I don’t build up higher then the thickness of the stencil – it doesn’t take much to create this illusion.  Scrap off excess material (with a light touch – not too much pressure) and then remove the stencil pulling straight up from the surface….if you did get a little bleed-under of material, Q-tips work well for cleanup – also, make sure to clean off the back of the stencil before repositioning if you did get bleed-under.  You will find that you will need to clean the stencil after every 2 to 3 repeats (I like to have at least two or three copies of the same design ready to use – this keeps the embossing going and then clean everything and start all over). For smaller stencils or small openings – you can use a spatula or styrene card to apply material over the stencil.

Volleyball Season

My daughter Ashley has been playing volleyball for the past 4 years on a club team (so, volleyball goes year-round for us).  So, beginning in February I travel a lot all over the State of California taking my daughter to tournaments and league games.  The team she is on is doing great this season – her team has qualified twice for the Junior Olympics so far this season and in the highest division possible. 

They came in second place in Denver, CO at the Colorado Crossroads tournament and they just finished third in Anaheim, CA @ the SoCal qualifier.  This season has been such a great experience for a teenage girl – I talk about the passion I have for decorative finishing and see that same passion in my daughter, but for the love of volleyball.

Don’t know where this will lead her – but the life experiences are priceless (well they cost mom and dad a lot of money – but it is worth it). 

Well, in between starting this post and getting it published – Ashley’s team had another qualifier in Reno, NV and her team finished 2nd – it’s their third time qualifying for the JO’s – WOW!

So, we are off to Dallas, TX on June 30th for the JO’s – I will get to celebrate my birthday in Dallas this year – for the past three years I have celebrated my birthday at the JO’s – Atlanta, Minnesota and now Dallas!

I’ll keep you posted on how her team does and how the good’ol birthday was (I was in Dallas in October for Meeting of the Masters – we went to a Piano Bar that was very fun – I may go back there for my birthday!)

SALI – Charleston, SC – July 2008

Most people that know me, do know that I’m a big supporter of the organization called SALI – Stencil Artisans League, Inc. (which is currently going through a name change that will be official at the convention this summer).  They have a annual convention coming this July 20-25th, 2008 in Charleston, SC – for a lot more information on the non-profit organization go to www.sali.org.

I have been involved in SALI for at least 20 years – when I discovered SALI it personally opened many doors for me.  I had discovered the Art of Stenciling – but, here in California I sure wasn’t finding much of anything on the art form.  Through SALI I found many different stencil companies, a great organization that has a inspiring magazine, insurance for professionals and support/networking through local and online chapters. 

SALI truly did change my life – I had been stenciling for several years (as a professional service) and finally had the opportunity to attend one of the annual conventions.  When I returned home after convention,  I told my husband that I knew what I wanted to do – with his support, I opened my own studio “The Stencilled Garden”.  Here at TSG we carried almost every stencil company and product related to stenciling, taught 100’s of classes in the art form and still offered custom stenciling.  We opened the studio in 1994 and we out grew our first location within three years and had to move to a larger building (only a couple blocks down the street) – as we continued to explore in the arts, we also offered classes in all decorative finishing – faux finishing, plasters, murals, stenciling, and much more.   We still have our studio – just changed the name about 3 years ago to reflect more of what we do “Artistic Painting Studio” is now what we are called. 

Not sure if I would be were I am today if it hadn’t been for SALI – if you love to paint as a professional or just love to paint, SALIhas something to offer everyone at every level.  There is nothing like being involved with a group of people that share your passion and the passion for paint is different than any other passion. 

If you are close enough to make the trip to Charleston, SC this summer – make sure not to miss this great event.  The teachers and classes are unbelievable – and the exhibition will be filled with evey great company you can imagine.  By the way – class registration is open online and is very easy to do – www.sali.org

I will also be teaching at convention this year – don’t forget to check out my classes……I will be co-teaching with an incredible gifted person (Krista Vind) she teaches for the Decorative Finishing Studio in KY.  These are new classes that we created together – finishes that are new and inspiring – plus Krista and I are a lot of fun!!! 

I hope that I will see some new faces at this years convention – it’s a wonderful opportunity to see and experience so much all in one place.