Free shipping on orders over $100! **After discounts have been applied & Continental US only

Odds & Ends

DIY Glitter & Foiled Pumpkins

I bet you’re getting excited to start decorating your pumpkins for this fall season. Well, don’t worry because we are too! The time of year when all our favorite fall colors and shapes come back around is finally here again.

Pumpkins in the grocery stores galore and carved Jack o’lanterns lighting up the streets on Halloween night! Let’s take our pumpkin creativity up a notch and make ours stand out with some foils & glitter! We are so excited to create some DIY glitter & foiled pumpkins with you!

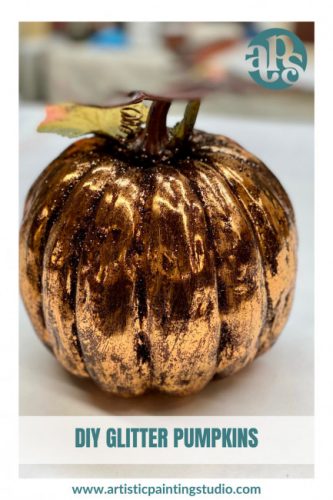
DIY Glitter Pumpkins

I found a great pumpkin from Hobby Lobby and base coated it in Bondago Black and allowed this to dry. Then apply a layer of our fabulous Foil Adhesive and allow this layer to dry for at least an hour.

I choose Copper Metallic Foil and cut a few pieces so I could do a section at a time. Place the pumpkin on one of the pieces so that it won’t stick to anything else. Then apply a piece to the pumpkin with the copper foil facing up (you should be able to see the color) and scrub the foil with a plastic scrub brush.

Copper foiled pumpkin with a fake leaf on it.

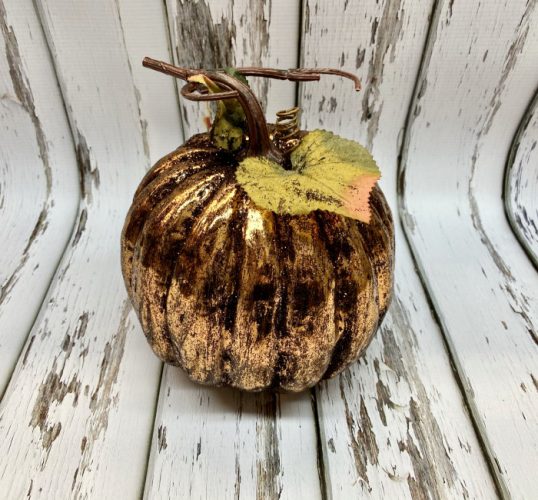
Keep applying a new section of foil, scrubbing it onto the surface until the entire pumpkin is covered with copper foil.

I left some of the base coat showing in the recessed areas and around the top of the pumpkin. These areas are still sticky and will work great with glitter. I applied our ash glitter over these areas to add a little extra bling! Just shake off the excess.

Xo, Jenn

Custom Foiled Pumpkins

It’s the time of year when we start to see pumpkins pop up in grocery stores and pumpkin patches on every corner. This is a great opportunity to use your creativity to decorate your own! The most popular way to do this is with paint, but those looking for something different should try metallic foils. I’m going to walk you through step-by-step to turn your pumpkin into a work of art and create your own custom foiled pumpkins!

Custom Foiled Pumpkins

You can do this on any pumpkin, but it might be easier to start with a small one so you don’t get overwhelmed. The plastic ones from all the craft stores are great to use as well and these will last forever!

Foils come in different colors and patterns, and I used our Silver Leopard for this project. You’ll want your foil color to match the color of your paint or base coat that you apply to your pumpkin. Yes, you will want to base coat your pumpkins first. For any foil that has black in the pattern, it’s best to use black as your base coat.

Apply your base coat color to your pumpkin (I used our Black Bondago) and allow it to dry for at least a couple of hours.

Then you will apply a layer of our fabulous Foil Adhesive and allow this to dry for no less than an hour.

Now it’s time for the real fun!

Let’s apply our Leopard Silver Metallic Foil!

You can cut a section to put under the pumpkin, so that sticky pumpkin has something safe to sit on! Then cut a few pieces of foil and do a section at a time. Apply the foil to the surface with the pattern side facing up, you should be able to see the design or color.

Then use a scrub brush, this can be a nail brush, stiff toothbrush, or a larger scrub brush (make sure these are all plastic). You will just scrub the surface to transfer the color or design to the surface.

Keep repeating this section by section until you have completed the entire pumpkin. After the pumpkin is completely covered, you will need to apply a layer of topcoat to protect your foils.

I cannot wait to see all the beautiful pumpkins you create! Text me a picture @ 714-202-9356!

Xo, Jenn

Custom Faux Woodgrain Sign

This was such a fun project that I created for our River House!  I had a large piece of left-over wood from another project I had done, and I thought it would be the perfect piece to create a custom faux woodgrain sign!

Custom Faux Woodgrain Sign

I primed the sign with Bondago Canvas White and then I applied the basecoat color of General Finishes Milk paint Millstone.  You will want to allow this to dry completely.

Next, we will create a fun faux woodgrain look using the Woodgrain Roller and a glaze mixture using General Finishes Antique White and Golden Paintworks Glazing Medium mixed 50/50.  You will apply this glaze mixture to the surface 100% coverage and while the glaze is wet you will roll the roller through the wet material.  For further explanation, watch the video below for the full application process.

Then I created a custom one-time-use stencil using my Cameo and a custom design for the Dan & Jenn. If you have your own Cameo or Cricut, you can create your own custom wording for your sign.

I attached the stencil to the surface using the technique shown in the video. You will weed the stencil and then use masking material you will transfer your stencil to the surface.

Then I used a traditional stenciling technique to stencil in all the openings with Black acrylic paint.

To finish off this project, you will want to topcoat your project to protect and enjoy it for many years!  It’s such a blast to create something custom and unique for your home and family!

I would love to see what you create! Text me a photo of your project to 714-202-9356 🙂

Xo, Jenn

Getting Creative with Foils

This was a super fun project that can be created for just about anywhere in your home that you are needing decoration! Getting creative with foils will allow you to create a custom sign for just about any occasion or holiday.

Getting Creative with Foils

I started with two items that I found at Hobby Lobby. I purchased a family cutout and plaque that I’m sure were 40% off! This girl always loves a good sale at my local Hobby Lobby and Michael’s!

I first painted everything with Black Bondago, which you know I love to use!  You will allow this to dry completely and then you will apply a layer of Foil Adhesive.

Next, you will brush on the foil adhesive with either a foam brush or an artist brush. Apply one layer of the foil adhesive to the top layer of both surfaces (plaque and family cutout).  The foil adhesive will be milky white when applied. Allow the foil adhesive to dry for at least an hour or better.

I used two different foils for this project, Copper Bronze Crackle, and Aberdean. Aberdean has been discontinued but our Indian Bronze Foil is very similar. DO NOT crinkle the Indian Bronze foil as I showed in the video with the Aberdean foil. Indian Bronze foil is a super easy release foil and the metallization will come off the carrier.

I used Copper Bronze Crackle foil on the plaque and then I used Aberean foil (you can use Indian Bronze foil) on the word family.   Just transfer as shown in the video.  Lay the foil pretty side facing you over the tacky foil adhesive and scrub until you like the transfer.

Topcoat both pieces with our Golden Paintworks Topcoat in gloss and allow to dry. Then glue the family cutout onto the plaque. I used Aleene’s Tacky glue which worked great.

You’re all done! Just find the perfect place to hang your project in your home!

Xo, Jenn

Custom Throw Pillows

I found these pillow covers at Hobby Lobby and choose the neutral color knowing this would go with my couch. I am so excited to show you how I created custom throw pillows.

They are great for customization and allow you to be able to create something that is unique and just the right touch of what you need for your home.

I love decorative pillows on my couch and can’t always seem to find what I’m looking for at the stores (and they are way more expensive than I’m willing to pay)!

Custom Throw Pillows DIY

I was wanting some pattern and color for the room and choose a large stencil design that would cover the entire side of the pillow.

I first took the stencil outside and used the Repositionable Spray Adhesive on the back of the stencil.  We don’t want the stencil to move while we are using it, so this will keep it in place.

I positioned the stencil onto the canvas pillow cover and secured it into place with tape.

Then I used the Deco Foil Fusible Spray Adhesive over the stencil design.  Just spray over the openings to create an even layer and allow it to dry for about 10 minutes.

Grab your iron and set it to medium heat. You will want to test how hot your iron gets and do a small sample first before you work on your actual project.

Then the hardest part is deciding on which Metallic Foil to use!!  I finally decided on the Wild Leopard Spots Gold Small. I like sneaking in my animal prints anywhere I can!!

Custom Throw Pillow

Once the Fusible Spray Adhesive has set up for 10 minutes, you can lay the foil over the entire design with the pattern side facing you.  Then you can either iron directly over the foils or put a piece of parchment paper down first and iron over the parchment paper to make sure you don’t have your iron too hot.

When ironing, make sure to keep the iron moving at all times. Iron over all the design/foil for at least a minute or two making sure all areas have been heated up and transferred to the adhesive.

Foils are a cool release, so make sure once you are done ironing you allow the foils to completely cool before removing.

That’s it folks, nothing else to do but enjoy this amazing, fun, and easy project!!

Washing tips:  Wash inside out, cold water, delicate cycle, and hang to dry. NO DRYER!!

Xo, Jenn

Mini Foiled Purse DIY

I had this wooden box sitting around my studio for at least five years before I decided to turn it into a mini foiled purse!  You know how this happens, you see something cute and think I can make this into… and then you never get to the project!  LOL!

Well, that happens to me way more than I would like to admit and I have so many projects around my studio just waiting for new life! I am so excited to share this fun mini foiled purse DIY with you!

DIY Foiled & Stenciled Purse

So, onto this adorable project that could be done with any type of cigar box, wooden box, etc.

First, you will want to start with my favorite base coat paint, Bondago Black. Paint the entire surface of your project inside and out and allow it to dry completely.

Then you will apply a layer of our amazing Foil Adhesive to the outside of the box and allow it to dry for at least an hour.

I used our metallic foil called Odessa which is a holographic foil that is so cool!! It looks green and pink from different angles.  You will then apply your foil to the areas with the foil adhesive. Then you will want to top coat to protect the surface before you apply the glass beads!

Yes, I had to Bling this project out even more and add Glass Bead Gel over a stencil!!

I used one of our most popular stencils, Nora Paige.  You will lay the stencil over the area of the purse that you want to emboss the stencil design on and tape your stencil into position.

Using our Color Shaper Tool and the ArtsSyVille Embellishments Glass Bead Gel, you will apply the glass bead gel over the stencil openings.  Emboss one side and allow to dry and then do the same on the other side of the purse.

I also found a metal handle for the purse and then just wrapped ribbon over it to match the foil color.

Even though this is a tiny purse, all a girl needs is a phone and credit card these days!! I hope you loved this mini foiled purse DIY! If you recreate a similar project, I would love to see it 😁 Text me a picture to 714-202-9356!

Xo, Jenn