Free shipping on orders over $100! **After discounts have been applied & Continental US only

Odds & Ends

The Little White Cabinet

Talk about taking FOVEVER to complete a project… I really think this one has been going on for over a year.  It keeps moving around my studio (uncompleted) from the office to the workroom and back to the office. I even started putting stuff on top of it! LOL! You know you’re in trouble when you start using a project and it’s not even finished yet!! It may never get finished at that point, it just becomes a piece of furniture in your office. LOL!

Well, part of the problem was I didn’t like what I did to the top of the cabinet.  Sometimes you do something and it just doesn’t come out as well as you had envisioned. Oh well… it just means another coat of something to change it!

I did decide on the White/Gold theme for this piece just because it was popular at the time, not because it was my favorite look.  This is also part of the reason it’s not completed… I just wasn’t feeling it!  But as time has gone on, I have changed several parts making it finally come together in my eyes and I’m the only one that has to love it for it to be finished!

But I would love to share my process on this adventure of the “Little White Cabinet” that I named Paige!

I started with the White Swan DIY Paint by Debi’s Design Diary (Love this paint!) and base coated the entire piece with two coats.

Then I decided to do a White on White crackle finish. I’ve always thought this was so elegant and such a subtle finish that’s barely there but adds so much character to a piece.  This technique was randomly placed here and there so that it would be more subtle and blend with the other elements I planned to use.

Then it was time to start “blinging” this piece up with Gold accents!  I choose the DeVille Scroll stencil to emboss the sides with a mixture of Glass Bead Gel and Gold Glitter.  Yup this is a blingy mix!  Just mix the Glitter color of your choice into the Glass Bead Gel, usually add about 3 tablespoons of glitter to 1 cup of Glass Bead Gel (I used 14K Gold Glitter for the color).

Make sure to spray the back of the stencil with a repositionable spray adhesive, we use the Stick it Spray Adhesive around here.  We spray this outdoors and then allow the adhesive to tack up for at least a minute or so.  This way it will not leave a sticky residue on your surface.  Once it has tacked up, position the stencil at the desired location and also use some of that wonderful “blue” tape to secure the stencil.

Then grab a Color Shaper Tool to apply the Glass Bead mixture (this is the greatest tool ever for applying glass beads… it is a must-have!)  Just scoop out some of the mixture and using the Color Shaper Tool, trowel it over the stencil openings.  Use light pressure and make sure to lay the beads down in one layer.  Try to not allow them to be thicker than the one bead thickness, otherwise, you can have “hazing” in the glass beads.  Here is another video to watch the process.

I embossed the Deville Scroll pattern twice on both sides of “Paige”.  Make sure to allow the first embossed design to dry before creating the second one.

Now it was time to enhance the architectural design of Paige with some foils that would match the Glass Bead/Glitter stencils.  I grabbed some of my fabulous Foil Adhesive and brushed it onto the areas that I wanted to foil including the doorknob and handle.  Once the Foil Adhesive dried to a firm tack (which is about 30 minutes to be safe) I just rubbed on the Warm Gold Foil using a scrubber brush.  If foils are new to you, check out this video.

Then I had this great ideal for the top of the cabinet (at least I thought it was a great idea) and I used the Diamonds Fauxy Roller to roll only through the middle of the top and still did some of the crackle on either side.  To be honest, it was only okay which is not how I want to feel about my pieces of artwork.  From here it even went more downhill and I decide to enhance this feature (what was I thinking) I hand brushed foil adhesive into the recessed lines of the Diamond pattern and put 14K glitter over the diamond lines (again, not sure what I was thinking) and I hated it and it sat like this for many months.  Trying to embrace it and fall in love with it… but I just couldn’t.

After Paige had moved around my workroom for many months and then for some reason it ended up in the office (probably trying to keep it safe during a workshop), I finally decided that the top just needed to be redone!  So, I sanded it off as much as I could and then applied a layer of Texture Medium to bury it!  Gotta love that Texture Medium, it works for so many things!

Ready for another layer and a better technique, I grabbed my Texture Medium and the Lotus Fauxy Roller for another attempt at making this piece gorgeous!  I troweled on a layer of Texture Medium and rolled the Lotus pattern through the wet material, you can watch this process here.

Once the Texture Medium was dry, I sanded off the high areas to make it smooth to the touch and just painted it White Swan.  Keeping it subtle to enhance the rest of everything that had been applied to this piece.  Once I did the top, I decided that I also needed to do the door this pattern as well.

Finally, after many months (maybe a year or so) Paige is completed!  She’s been on a long journey to get where she’s ended up, but sometimes it just takes that long to complete the vision!

I’m sure that you all have experienced a similar story…  As we try to create a masterpiece with every project it doesn’t always go as planned at first, but it always works out in the end 🙂  Please feel free to share your story in the comments below!!

Let’s Enhance Your Garden With Foils

Yes, you heard that right… Why not bling up your gardening hat, boots, apron, gloves, and tools?? Such a fun way to customize anything and everything you have!

I’m so blessed to have such amazing Retailers!!  Terri Cosby, of The Creator’s Vintage Store, took my foils to the garden and what a fabulous idea it was.  I absolutely love all the creativity in this network of retailers and how they are so willing to try and experiment with different surfaces and just see if things will work.  You know that’s what it’s all about…  Just trying and seeing what all my Foil Adhesive and Foils will adhere to.

Let’s Check Out Some Of The Projects Terri Created

First, look at this adorable hat!!

Terri used the ArtsSyVille Embellishments Foil Adhesive and the Baylee Foil pattern to create this entire collection.

Foiled Garden Set by Terrie

Look at this beautiful sphere that Terrie created!! And it’s not her first, she’s done two of these and OMGosh they are amazing!!  But, you will never believe that this is just an old bowling ball…  YES!! It’s just a bowling ball blinged with our Pebbles Foil!!

Bronze Pebbles Foil
Blue Pebbles Foil

If you are new to the art of Foils… here are some of the basics:

First, apply a layer of the Foil Adhesive to your surface by brush or roller.  Try to smooth out your application marks (this product does not self-level, so try to create a smooth application), then allow it to dry for at least 30 minutes to an hour.  The longer the better!  It dries to a “firm tack” and never beyond, but it is best to allow it to dry for several hours if possible, to get it to a harder firm tack for the best transfer possible.

Once the Foil Adhesive is at a firm tack, you will then take one of our fabulous foils and lay it over the adhesive.  Make sure that the “pretty side” is facing up, then you can rub the foil with a soft cloth and then peak underneath to see how much transfer you have and if it’s not enough you can use a scrub brush (stiff plastic bristles work great) and scrub the back of the foil (make sure to only scrub in one direction).

Peak again under the foil to see how fabulous the foil transfer is and then remove the plastic carrier.  You will need to protect your foils with a good top coat and check the sheens on a sample board to make sure you are getting the look you want.

Ready to learn more?? Head HERE to check out my YouTube Channel.


More of Terrie’s Garden Set:

Foiled Watering Can
Foiled Garden Hat
Foiled Garden Set

Let’s Create A Faux Wood Floor

I love it when my wonderful customers share their projects and this one is simple and fabulous!!

Not only do we have written instructions for you but also a video that Gabriella made to show the process! How awesome is that???

Gabriella started with a base of Sunset Prairie paint by Fusion Paint.  For those of you who don’t have Fusion Paint here’s a color from the Benjamin Moore fan deck that would be comparable… York Harbor Yellow 2154-40.

Then Gabriella taped off sections to create wood planks, making it look like real wood.  You can tape off any size planks you want, but the Wood Grain roller is 7” wide.

She then mixed up a couple of glazes and paint 50/50.  We would use Golden Paintworks Glaze and Modern Masters Coffee Bean colorant to make the first glaze and the second glaze would just be the Modern Masters Black Colorant.  Brush the Brown glaze onto the surface and then add some of the Black glaze to create some variance in the color and planks.  While the glaze is wet, roll through it with the Wood Grain Roller to create the pattern.  Gabriella used a brush to create more texture and grain effects on the faux wood floor.  Allow the glaze to completely dry (this should take overnight) and then tape off the next sections.

Make sure to clear coat with a really good topcoat to protect the surface!

I love this!!

Gabriella got so excited when she was doing this that she walked right through the wet paint…  That is something I would do!! LOL!

Project #2

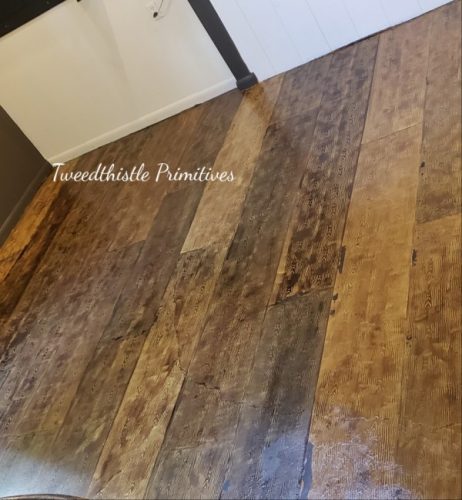
Here is another project that was created with the Wood Grain roller using a different technique.

I started with a concrete floor and all I did for prep was clean it, and I can say I’m sure I didn’t do a really good job!  LOL!

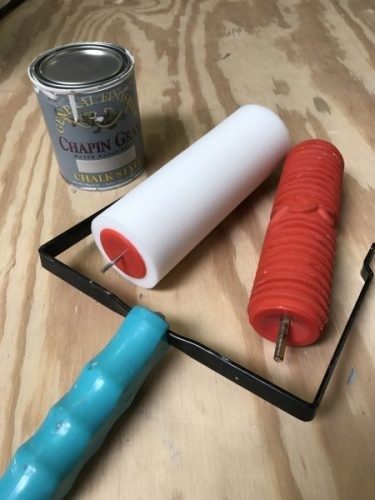
I used our Converter Bar to convert the Wood Grain Roller to our Stamping Roller Handle.  This allowed me to create a positive application and just roll the pattern onto the concrete floor.

I used the General Finishes Chalk Paint Chapen Gray to load onto the Sponge Applicator.  Then I just rolled the design onto the floor, one pass after another to create the look of wood planks.

Once the paint was dry, I added some hand details where needed, like the area that the roller can’t reach or areas that I just couldn’t get to because there is a permanent ladder there.  I also added a stencil design (Hampton Medallion) randomly for more character.

Either technique will create a fabulous Faux wood floor and it’s fun and easy with the Wood Grain Roller.

Grab yourself some product and get rollin’ 🙂


ArtsSyVille Crackle Mediums

So… We’re Talking About Crackle This Week

Of course, this is another product that I have been obsessed with for many years (maybe even 30 years haha)!  I love anything that you can control the reaction and figure out new ways to control the reaction of the product (if possible)…  The mad scientist in me LOL 🙂

A few Monday’s ago Jane Bellante, of Morning Dew Creations, showed my incredible followers how to use our Crystal Clear Crackle and Cracking Size during Retailer Spotlight (our new Facebook Live series featuring our amazing retailers).  If you missed the Facebook Live, you should definitely watch it. Here is the link for your convenience 😉

Let’s Talk About These Products & How To Use Them  

Crystal Clear Crackle will crack all on its own, but the cracks are going to be a super fine china crackle.  This fine crackle is so small that even with enhancing it is still hard to see and appreciate, but could be good for some projects if you need that fine or delicate of a crackle finish.

Jane Bellante, Morning Dew Creations

This is where the Cracking Size comes in and allows you to start to control the size of your cracks/islands.  If you apply a layer of the Cracking Size and allow to dry for several hours, then you can apply a layer of the Crystal Clear Crackle and sit back and watch it crack.  Well… I really don’t do that but after 30 to 60 minutes, it’s fun to check and see how much has cracked.  This application process is a thin layer of the Cracking Size and a little thicker application of the Crystal Clear Crackle.

From here we can start to adjust and control the size of cracks.  Just think of it as the more product the more reaction, which will provide larger cracks/islands.  If you apply an even thin layer of the Cracking Size and then apply a thicker layer of the Crystal Clear Crackle, the cracks will be larger.  If you want even larger cracks, you can apply a layer of the Cracking Size and allow it to dry and then apply another layer of the Cracking Size.  Allow this to dry for several hours and then apply a generous layer of the Crystal Clear Crackle.  Again this will provide you with even larger cracks/islands.

Jane Bellante, Morning Dew Creations

As for the Crystal Clear Crackle, the thicker you apply this product the larger the cracks will be, but you will also have to watch this product wanting to sag/drip if vertical application.  Best if you are looking for the largest cracks, to apply in a horizontal application if possible.

Now, if you want to just get crazy like me, you can start to create sample boards experimenting with different levels of products and taking notes on how to achieve the perfect size crackle for your project.  Or… you can just wing it like most and have fun with applying the Crystal Clear Crackle thin and thick for a variety of crack sizes.

Emily Kerley, Milkmaid Creations & Antiques

No matter what size cracks you create, this product is going to produce a clear crackle finish and it needs to be enhanced to see it well.  There are many ways to do this.  You can apply a layer of glaze to the crackle and the glaze color will settle down into the cracks, you can apply a wax finish over the crackle, and you can even enhance with Mica Powders.  You can use just about anything that is more transparent.  You just don’t want to use anything opaque over it.

Check out this awesome video done on my ArtsSyVille Crackle mediums by Morey of PAINTED studio.

If you have any questions with the application process, or you would like to share your experience, please comment below 🙂

Crafters Convention 2019

What a fabulous experience this Convention was!! This group of creatives was extremely welcoming and I made so many new friends 🙂

I was welcomed by the attendees, vendors and Waterman’s Loft team with open arms.  This convention was geared towards “crafters” but they were mainly Wreath Makers and they made some incredibly beautiful wreaths.

Throughout my 30 plus years in business, I have always liked reaching out to new groups of creatives and meeting new people. Like I said, most of this group of creatives were Wreath Makers, so they didn’t really know about my products. But… That is the fun part! I love getting to introduce my products to new people and see how they can find a new use for my products that will work with their craft!

Myself and Damon Oates

During the convention, I was chosen during the “After Dark with Damon” evening event to join Damon Oates on stage.  I was honored that I was able to create my very first wreath with the help of an amazing teacher/mentor.  Talk about learning from one of the best in the industry!  I had a private lesson in front of a few hundred peeps, and it was even on Live Stream.  It was a pretty funny evening, Scott Waterman and Damon Oates could have a comedy show.  During this 2 plus hours of crafting, telling jokes, a little dancing by Scott (and karaoke), I created an amazing whimsical Christmas Wreath. I loved it!!

Crafting with Damon Oates

And guess what y’all… I totally have a new appreciation for Wreath Makers!!  That Mesh can be pretty rough on the hands. I had a few battle wounds the next day! LOL! Layer by layer, pinching and twisting, adding tails, a cute little painted snowman, and some fabulous bows, this wreath was completed in the record time of 2.5 hours… LOL! 🙂

My Beautiful Finished Wreath

I really did learn a lot during this demonstration, to the point that I think I could do this again! (I may have to hope on a Scott or Damon FB Live for a refresher course LOL). I want to recreate the wreath I did on stage with Damon for my front door this year.  He had picked some of my FAV colors!  We had Teal, Red, Black, we had stripes, polka-dots, plaid, and glitter.  What else could this girl ask for? 🙂

Check Out My Foiled Jeans

I was also part of the line-up of presenters for day two of the convention.  I had a generous hour to present Foils and Rollers to this fun group.  OMGosh I really needed two hours!!  I shared as much information as I could about working with Foils, but there are so many different techniques and applications, it’s hard to teach them all at once.  I wanted to make sure they got their monies worth!!  I’m hoping for a two-hour time-slot next year… Did you hear that Scott?? 🙂

Being Introduced by Scott Waterman

I think and believe that it’s such a great experience to attend events like this one. There is time to meet fellow crafters/creatives, network, grow your knowledge and build community with a group of new friends.  Nothing can compare to hands-on learning, creating, and building lifelong friends.

I feel that everyone should pick at least one event each year to attend, invest in yourself and grow in your craft! You deserve it!

Ashley and I Working the Booth

As I talk about this wonderful experience at Crafters Convention, I want to share that my wheels are spinning and you can most likely plan to attend an event hosted by yours-truly in 2020!! 🙂  I feel that there is such a need for this type of learning and community building that I’m crazy enough to just put one on myself.  As we research the details over the next couple of months, we will be sure to share as soon as we can so that you can pencil this event into your calendar for 2020.

Some words of wisdom… Make sure to not limit yourself, always be searching to expand your knowledge, try new things, get out of your comfort zone, always push yourself to be better, set goals that push you, surround yourself with like-minded people that inspire and motivate you!!


Fauxy Rollers: The Creative Tool You Need

Do you ever get in a creative rut? Are you ready to start your next DIY project but don’t have any inspiration? I have the perfect tool to help you get those creative juices flowing! Fauxy Rollers! My collection of Decorative Art Rollers come in over 50 different patterns and you are sure to find the pattern that is going to spark that inspiration.

Rollers are a fantastic tool to have in your Creative Tool Chest, one of those tools you can grab and create with on a whim! They are sure to bring inspiration with all the different and fun patterns.

Nothing like a little texture and design to enhance a boring piece of furniture. Rollers are wonderful with Texture, Paint, Glaze, and Stains 🙂

They can embellish just about anything! I mean the possibilities have seemed pretty endless with the beautiful projects my customers have created. Here is a fabulous collection of projects that our customers have created over the years.

Crocodile Roller by Angie of Rockstar Glam House
Diamond Roller by Shawna Wood of Paintopia Studio
Crocodile Roller by Gray Gardens Design and Salvage
Chrysanthemum Roller by Nicole Nichols of Rusty Barn Creations With Paint
Crocodile Roller by Katherine Netzinger of Imagined Finishes
This is my creation using the Ostrich Roller
Wavy Horizontal Lines Roller
Beaded Curtain Roller

WOW! My customers are so talented 🙂 I love getting to see all the beautiful projects all of you create!!

Are you ready to jump on the Roller train?? Snag your favorite patterns HERE!

Want to learn how to be the best “Roller” possible?? Check out these tutorials HERE!